This is the multi-page printable view of this section. Click here to print.
How-to guides
- 1: Register machines with Omni
- 1.1: Register a Bare Metal Machine (ISO)
- 1.2: Register a Bare Metal Machine (PXE/iPXE)
- 1.3: Register a GCP Instance
- 1.4: Register an AWS EC2 Instance
- 1.5: Register an Azure Instance
- 1.6: Register a Hetzner Server
- 1.7:
- 2: Create Etcd Backups
- 3: Create a Machine Class
- 4: Expose an HTTP Service from a Cluster
- 5: Create an Omni Service Account
- 6: Create a Service Account Kubeconfig
- 7: Scale a Cluster Up or Down
- 8: Install and Configure Omnictl
- 9: Use Kubectl With Omni
- 10: Create a Cluster
- 11: Create a Hybrid Cluster
- 12: Create a Patch For Cluster Machines
- 13: Export a Cluster Template from a Cluster Created in the UI
- 14: Install Talos System Extensions
- 15: Install talosctl
- 16: Manage Access Policies (ACLs)
- 17: Restore Etcd of a Cluster Managed by Cluster Templates to an Earlier Snapshot
- 18: File an Issue
- 19: Run Omni on your own infrastructure
- 19.1: Deploy Omni On-prem
- 19.2: Configure Keycloak for Omni
- 19.3: Back Up On-prem Omni Database
- 19.4: How to expose Omni with Nginx (HTTPS)
- 19.5: Configure Entra ID AD for Omni
- 19.6: Configure Okta for Omni
- 19.7:
- 20: Using SAML with Omni
- 20.1: Auto-assign roles to SAML users
- 20.2: Add a User to Omni with SAML Enabled
- 20.3: Configure Unifi Identity Enterprise for Omni
- 20.4: Configure Workspace ONE Access for Omni
- 20.5:
- 21:
- 22:
- 23:
- 24:
- 25:
- 26:
- 27:
1 - Register machines with Omni
The first step to creating and managing Kubernetes clusters in Omni is to register the machines you wish to use. The machines can run anywhere Talos Linux runs - which is almost anywhere. These guides walk you through the specifics for different platforms.
1.1 - Register a Bare Metal Machine (ISO)
This guide shows you how to register a bare metal machine with Omni by booting from an ISO.
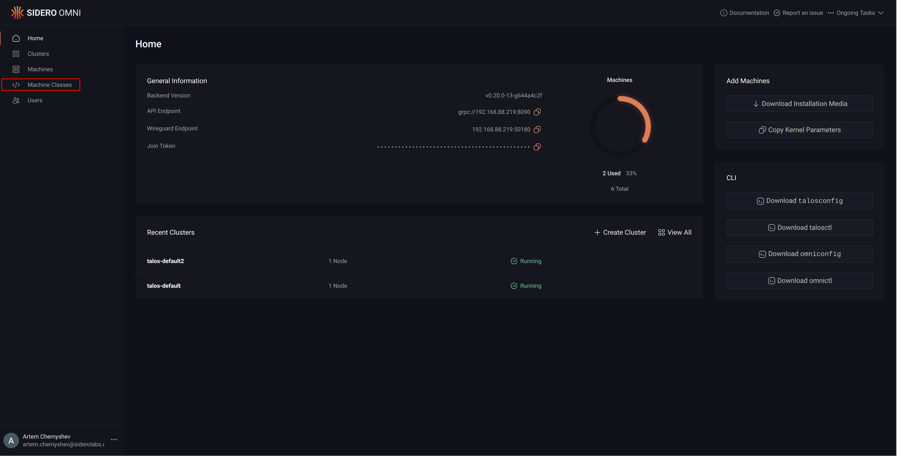
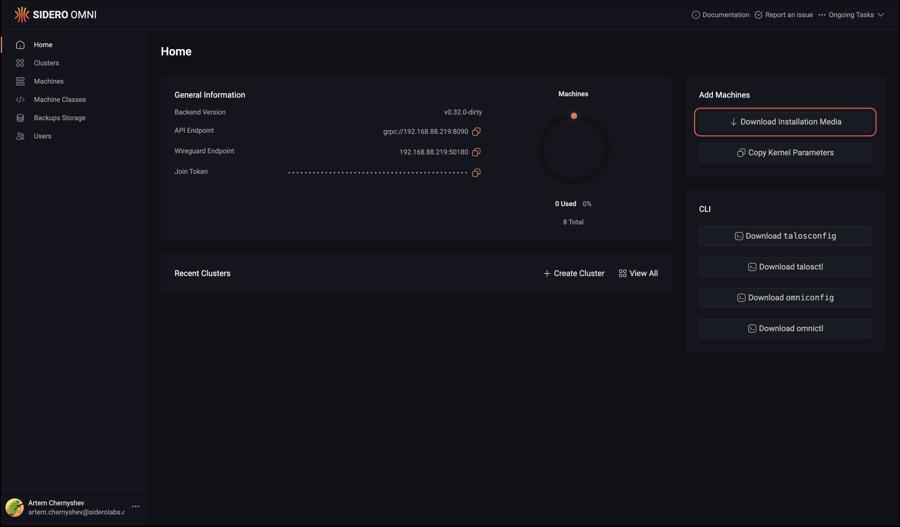
Dashboard
Upon logging in you will be presented with the Omni dashboard.

Download the ISO
First, download the ISO from the Omni portal by clicking on the “Download Installation Media” button.
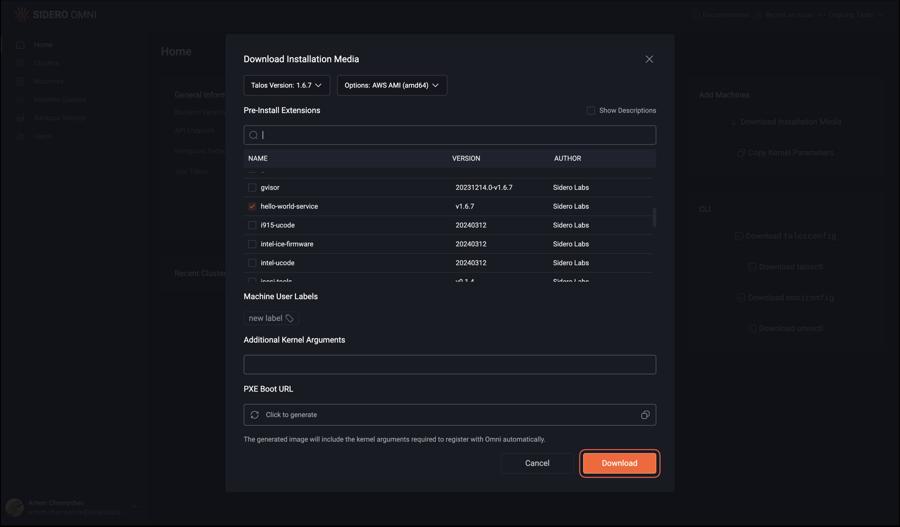
Now, click on the “Options” dropdown menu and search for the “ISO” option.
Notice there are two options: one for amd64 and another for arm64.
Select the appropriate option for the machine you are registering.
Now that you have selected the ISO option for the appropriate architecture, click the “Download” button.

Write the ISO to a USB Stick
First, plug the USB drive into your local machine. Now, find the device path for your USB drive and write the ISO to the USB drive.
diskutil list
...
/dev/disk2 (internal, physical):
   #:                       TYPE NAME                    SIZE       IDENTIFIER
   0:                                                   *31.9 GB    disk2
...
In this example disk2 is the USB drive.
dd if=<path to ISO> of=/dev/disk2 conv=fdatasync
$ lsblk
...
NAME   MAJ:MIN RM  SIZE RO TYPE MOUNTPOINTS
sdb      8:0    0 39.1G  0 disk
...
In this example sdb is the USB drive.
dd if=<path to ISO> of=/dev/sdb conv=fdatasync
Boot the Machine
Now that we have our bootable USB drive, plug it into the machine you are registering. Once the machine is booting you will notice logs from Talos Linux on the console stating that it is reachable over an IP address.
Warning
Machines must be able to egress to your account’s WireGuard port and port 443.Conclusion
Navigate to the “Machines” menu in the sidebar. You should now see a machine listed.

You now have a bare metal machine registered with Omni and ready to provision.
1.2 - Register a Bare Metal Machine (PXE/iPXE)
This guide shows you how to register a bare metal machine with Omni by PXE/iPXE booting.
Copy the Required Kernel Parameters
Upon logging in you will be presented with the Omni dashboard. Click the “Copy Kernel Parameters” button and save the value for later.

Download the PXE/iPXE Assets
Download vmlinuz and initramfs.xz from the release of your choice (Talos Linux 1.2.6 or greater is required), and place them in /var/lib/matchbox/assets.
Create the Profile
Place the following in /var/lib/matchbox/profiles/default.json:
{
  "id": "default",
  "name": "default",
  "boot": {
    "kernel": "/assets/vmlinuz",
    "initrd": ["/assets/initramfs.xz"],
    "args": [
      "initrd=initramfs.xz",
      "init_on_alloc=1",
      "slab_nomerge",
      "pti=on",
      "console=tty0",
      "console=ttyS0",
      "printk.devkmsg=on",
      "talos.platform=metal",
      "siderolink.api=<your siderolink.api value>",
      "talos.events.sink=<your talos.events.sink value>",
      "talos.logging.kernel=<your talos.logging.kernel value>"
    ]
  }
}
Update siderolink.api, talos.events.sink, and talos.logging.kernel with the kernel parameters copied from the dashboard.
Place the following in /var/lib/matchbox/groups/default.json:
Create the Group
{
  "id": "default",
  "name": "default",
  "profile": "default"
}
Once your machine is configured to PXE boot using your tool of choice, power the machine on.
Conclusion
Navigate to the “Machines” menu in the sidebar. You should now see a machine listed.

You now have a bare metal machine registered with Omni and ready to provision.
1.3 - Register a GCP Instance
This guide shows you how to register a GCP instance with Omni.
Dashboard
Upon logging in you will be presented with the Omni dashboard.

Download the Image
First, download the GCP image from the Omni portal by clicking on the “Download Installation Media” button.
Now, click on the “Options” dropdown menu and search for the “GCP” option.
Notice there are two options: one for amd64 and another for arm64.
Select the appropriate option for the machine you are registering.
Now that you have selected the GCP option for the appropriate architecture, click the “Download” button.

Upload the Image
In the Google Cloud console, navigate to Buckets under the Cloud Storage menu, and create a new bucket with the default.
Click on the bucket in the Google Cloud console, click Upload Files, and select the image download from the Omni console.
Convert the Image
In the Google Cloud console select Images under the Compute Engine menu, and then Create Image.
Name your image (e.g. Omni-talos-1.2.6), then select the Source as Cloud Storage File.
Click Browse in the Cloud Storage File field and navigate to the bucket you created.
Select the image you uploaded.
Leave the rest of the options at their default and click Create at the bottom.
Create a GCP Instance
In Google Cloud console select VM instances under the Compute Engine menu.
Now select Create Instance.
Name your instance, and select a region and zone.
Under “Machine Configuration”, ensure your instance has at least 4GB of memory.
In the Boot Disk section, select Change and then select Custom Images.
Select the image created in the previous steps.
Now, click Create at the bottom to create your instance.
Conclusion
Navigate to the “Machines” menu in the sidebar. You should now see a machine listed.

You now have a GCP machine registered with Omni and ready to provision.
1.4 - Register an AWS EC2 Instance
This guide shows you how to register an AWS EC2 instance with Omni.
Set your AWS region
REGION="us-west-2"
Creating the subnet
First, we need to know what VPC to create the subnet on, so let’s describe the VPCs in the region where we want to create the Omni machines.
$ aws ec2 describe-vpcs --region $REGION
{
    "Vpcs": [
        {
            "CidrBlock": "172.31.0.0/16",
            "DhcpOptionsId": "dopt-0238fea7541672af0",
            "State": "available",
            "VpcId": "vpc-04ea926270c55d724",
            "OwnerId": "753518523373",
            "InstanceTenancy": "default",
            "CidrBlockAssociationSet": [
                {
                    "AssociationId": "vpc-cidr-assoc-0e518f7ac9d02907d",
                    "CidrBlock": "172.31.0.0/16",
                    "CidrBlockState": {
                        "State": "associated"
                    }
                }
            ],
            "IsDefault": true
        }
    ]
}
Note the VpcId (vpc-04ea926270c55d724).
Now, create a subnet on that VPC with a CIDR block that is within the CIDR block of the VPC. In the above example, as the VPC has a CIDR block of 172.31.0.0/16, we can use 172.31.128.0/20.
$ aws ec2 create-subnet \
    --vpc-id vpc-04ea926270c55d724 \
    --region us-west-2 \
    --cidr-block 172.31.128.0/20
{
    "Subnet": {
        "AvailabilityZone": "us-west-2c",
        "AvailabilityZoneId": "usw2-az3",
        "AvailableIpAddressCount": 4091,
        "CidrBlock": "172.31.192.0/20",
        "DefaultForAz": false,
        "MapPublicIpOnLaunch": false,
        "State": "available",
        "SubnetId": "subnet-04f4d6708a2c2fb0d",
        "VpcId": "vpc-04ea926270c55d724",
        "OwnerId": "753518523373",
        "AssignIpv6AddressOnCreation": false,
        "Ipv6CidrBlockAssociationSet": [],
        "SubnetArn": "arn:aws:ec2:us-west-2:753518523373:subnet/subnet-04f4d6708a2c2fb0d",
        "EnableDns64": false,
        "Ipv6Native": false,
        "PrivateDnsNameOptionsOnLaunch": {
            "HostnameType": "ip-name",
            "EnableResourceNameDnsARecord": false,
            "EnableResourceNameDnsAAAARecord": false
        }
    }
}
Note the SubnetID (subnet-04f4d6708a2c2fb0d).
Create the Security Group
$ aws ec2 create-security-group \
    --region $REGION \
    --group-name omni-aws-sg \
    --description "Security Group for Omni EC2 instances"
{
    "GroupId": "sg-0b2073b72a3ca4b03"
}
Note the GroupId (sg-0b2073b72a3ca4b03).
Allow all internal traffic within the same security group, so that Kubernetes applications can talk to each other on different machines:
aws ec2 authorize-security-group-ingress \
    --region $REGION \
    --group-name omni-aws-sg \
    --protocol all \
    --port 0 \
    --source-group omni-aws-sg
Creating the bootable AMI
To do so, log in to your Omni account, and, from the Omni overview page, select “Download Installation Media”. Select “AWS AMI (amd64)” or “AWS AMI (arm64)”, as appropriate for your desired EC2 instances. (Most are amd64.) Click “Download”, and the AMI will be downloaded to you local machine.
Extract the downloaded aws-amd64.tar.gz
Then copy the disk.raw file to S3.
We need to create a bucket, copy the image file to it, import it as a snapshot, then register an AMI image from it.
Create S3 bucket
REGION="us-west-2"
aws s3api create-bucket \
    --bucket <bucket name> \
    --create-bucket-configuration LocationConstraint=$REGION \
    --acl private
Copy image file to the bucket
aws s3 cp disk.raw s3://<bucket name>/omni-aws.raw
Import the image as a snapshot
$ aws ec2 import-snapshot \
    --region $REGION \
    --description "Omni AWS" \
    --disk-container "Format=raw,UserBucket={S3Bucket=<bucket name>,S3Key=omni-aws.raw}"
{
    "Description": "Omni AWS",
    "ImportTaskId": "import-snap-1234567890abcdef0",
    "SnapshotTaskDetail": {
        "Description": "Omni AWS",
        "DiskImageSize": "0.0",
        "Format": "RAW",
        "Progress": "3",
        "Status": "active",
        "StatusMessage": "pending"
        "UserBucket": {
            "S3Bucket": "<bucket name>",
            "S3Key": "omni-aws.raw"
        }
    }
}
Check the status of the import with:
$ aws ec2 describe-import-snapshot-tasks \
    --region $REGION \
    --import-task-ids
{
    "ImportSnapshotTasks": [
        {
            "Description": "Omni AWS",
            "ImportTaskId": "import-snap-1234567890abcdef0",
            "SnapshotTaskDetail": {
                "Description": "Omni AWS",
                "DiskImageSize": "705638400.0",
                "Format": "RAW",
                "Progress": "42",
                "Status": "active",
                "StatusMessage": "downloading/converting",
                "UserBucket": {
                    "S3Bucket": "<bucket name>",
                    "S3Key": "omni-aws.raw"
                }
            }
        }
    ]
}
Once the Status is completed note the SnapshotId (snap-0298efd6f5c8d5cff).
Register the Image
$ aws ec2 register-image \
    --region $REGION \
    --block-device-mappings "DeviceName=/dev/xvda,VirtualName=talos,Ebs={DeleteOnTermination=true,SnapshotId=$SNAPSHOT,VolumeSize=4,VolumeType=gp2}" \
    --root-device-name /dev/xvda \
    --virtualization-type hvm \
    --architecture x86_64 \
    --ena-support \
    --name omni-aws-ami
{
    "ImageId": "ami-07961b424e87e827f"
}
Note the ImageId (ami-07961b424e87e827f).
Create EC2 instances from the AMI
Now, using the AMI we created, along with the security group created above, provision EC2 instances:
 aws ec2 run-instances \
    --region  $REGION \
    --image-id ami-07961b424e87e827f \
    --count 1 \
    --instance-type t3.small   \
    --subnet-id subnet-0a7f5f87f62c301ea \
    --security-group-ids $SECURITY_GROUP   \
    --associate-public-ip-address \
    --tag-specifications "ResourceType=instance,Tags=[{Key=Name,Value=omni-aws-ami}]" \
    --instance-market-options '{"MarketType":"spot"}'
1.5 - Register an Azure Instance
This guide shows you how to register an Azure instance with Omni.
Dashboard
Upon logging in you will be presented with the Omni dashboard.

Download the Image
Download the Azure image from the Omni portal by clicking on the “Download Installation Media” button.
Click on the “Options” dropdown menu and search for the “Azure” option.
Notice there are two options: one for amd64 and another for arm64.
Select the appropriate architecture for the machine you are registering, then click the “Download” button.
Once downloaded to your local machine, untar with tar -xvf /path/to/image
Upload the Image
In the Azure console, navigate to Storage accounts, and create a new storage account.
Once the account is provisioned, navigate to the resource and click Upload. In the Upload Blob form, select Create New container, and name your container (e.g. omni-may-2023).
Now click Browse for Files, and select the disk.vhd file that you uncompressed above, then select Upload.
We’ll make use of the following environment variables throughout the setup. Edit the variables below with your correct information.
# Storage account to use
export STORAGE_ACCOUNT="StorageAccountName"

# Storage container to upload to
export STORAGE_CONTAINER="StorageContainerName"

# Resource group name
export GROUP="ResourceGroupName"

# Location
export LOCATION="centralus"

# Get storage account connection string based on info above
export CONNECTION=$(az storage account show-connection-string \
                    -n $STORAGE_ACCOUNT \
                    -g $GROUP \
                    -o tsv)
You can upload the image you uncompressed to blob storage with:
az storage blob upload \
  --connection-string $CONNECTION \
  --container-name $STORAGE_CONTAINER \
  -f /path/to/extracted/disk.vhd \
  -n omni-azure.vhd
Convert the Image
In the Azure console select Images, and then Create.
Select a Resource Group, Name your image (e.g. omni-may), and set the OS type to Linux.
Now Browse to the storage blob created above, navigating to the container with the uploaded disk.vhd.
Select “Standard HDD” for account type, then click Review and Create, then Create.
Now that the image is present in our blob storage, we’ll register it.
az image create \
  --name omni \
  --source https://$STORAGE_ACCOUNT.blob.core.windows.net/$STORAGE_CONTAINER/omni-azure.vhd \
  --os-type linux \
  -g $GROUP
Create an Azure Instance
Creating an instance requires setting the os-disk-size property, which is easiest to achieve via the CLI:
az vm create \
    --name azure-worker \
    --image omni \
    -g $GROUP \
    --admin-username talos \
    --generate-ssh-keys \
    --verbose \
    --os-disk-size-gb 20
Conclusion
In the Omni UI, navigate to the “Machines” menu in the sidebar. You should now see the Azure machine that was created listed as an available machine, registered with Omni and ready to provision.
1.6 - Register a Hetzner Server
This guide shows you how to register a Hetzner server with Omni.
Dashboard
Upon logging in you will be presented with the Omni dashboard.

Download the Hetzner Image
First, download the Hetzner image from the Omni portal by clicking on the “Download Installation Media” button.
Now, click on the “Options” dropdown menu and search for the “Hetzner” option.
Notice there are two options: one for amd64 and another for arm64.
Select the appropriate option for the machine you are registering.
Now, click the “Download” button.

Place the following in the same directory as the downloaded installation media and name the file hcloud.pkr.hcl:
packer {
  required_plugins {
    hcloud = {
      version = ">= 1.0.0"
      source  = "github.com/hashicorp/hcloud"
    }
  }
}

locals {
  image = "<path to downloaded installation media>"
}

source "hcloud" "talos" {
  rescue       = "linux64"
  image        = "debian-11"
  location     = "hel1"
  server_type  = "cx11"
  ssh_username = "root"

  snapshot_name = "Omni Image"
}

build {
  sources = ["source.hcloud.talos"]

  provisioner "file" {
    source = "${local.image}"
    destination = "/tmp/talos.raw.xz"
  }

  provisioner "shell" {
    inline = [
      "xz -d -c /tmp/talos.raw.xz | dd of=/dev/sda && sync",
    ]
  }
}
Now, run the following:
export HCLOUD_TOKEN=${TOKEN}
packer init .
packer build .
Take note of the image ID produced by by running this command.
Create a Server
hcloud context create talos

hcloud server create --name omni-talos-1 \
    --image <image ID> \
    --type cx21 --location <location>
Warning
Machines must be able to egress to your account’s WireGuard port and port 443.Conclusion
Navigate to the “Machines” menu in the sidebar. You should now see a machine listed.

You now have a Hetzner server registered with Omni and ready to provision.
1.7 -
registering-machines
2 - Create Etcd Backups
CLI
First of all, check the current overall status of the cluster backup subsystem:
omnictl get etcdbackupoverallstatus
If you have freshly created Omni instance, the output will be similar to this:
NAMESPACE   TYPE                      ID                          VERSION   CONFIGURATION NAME   CONFIGURATION ERROR   LAST BACKUP STATUS   LAST BACKUP ERROR   LAST BACKUP TIME   CONFIGURATION ATTEMPT
ephemeral   EtcdBackupOverallStatus   etcdbackup-overall-status   1         s3                   not initialized
The combination of the CONFIGURATION NAME and CONFIGURATION ERROR fields display the current backup store configuration status.
Currently, Omni supports two backup stores: local and s3.
These are configured during Omni initialization.
The output above indicates that the backup store is set to use the s3 store.
However, the s3 configuration itself has not yet been added, so the CONFIGURATION ERROR field shows not initialized.
The rest of the fields show as empty because no backups have been created yet.
S3 configuration
To use S3 as the backup storage, you will first need to configure the S3 credentials for Omni to use.
This can be done by creating an EtcdBackupS3Configs.omni.sidero.dev resource in Omni.
Below is an example for Minio S3:
metadata:
  namespace: default
  type: EtcdBackupS3Configs.omni.sidero.dev
  id: etcd-backup-s3-conf
spec:
  bucket: mybucket
  region: us-east-1
  endpoint: http://127.0.0.1:9000
  accesskeyid: access
  secretaccesskey: secret123
  sessiontoken: ""
Let’s go through the fields:
bucket- the name of the S3 bucket for storing backups. This is the only field required in all cases.region- the region of the S3 bucket. If not provided, Omni will use the default region.endpoint- the S3 endpoint. If not provided, Omni will use the default AWS S3 endpoint.accesskeyidandsecretaccesskey- the credentials to access the S3 bucket. If not provided, Omni will assume it runs in an EC2 instance with an IAM role that has access to the specified S3 bucket.sessiontoken- the session token (if any) for accessing the S3 bucket.
Save it as <file-name>.yaml and apply using omnictl apply -f <file-name>.yaml.
During resource creation, Omni will validate the provided credentials by attempting to list the objects in the bucket.
It will return an error if the validation fails and will not update the resource.
Let’s get our overall status again and check the output:
NAMESPACE   TYPE                      ID                          VERSION   CONFIGURATION NAME   CONFIGURATION ERROR   LAST BACKUP STATUS   LAST BACKUP ERROR   LAST BACKUP TIME   CONFIGURATION ATTEMPT
ephemeral   EtcdBackupOverallStatus   etcdbackup-overall-status   2         s3
Note that the CONFIGURATION ERROR field is now empty, indicating that the provided configuration is valid.
Manual backup
Now, let’s create a manual backup. To do that, we need to create a resource:
metadata:
  namespace: ephemeral
  type: EtcdManualBackups.omni.sidero.dev
  id: <your-cluster-name>
spec:
  backupat:
    seconds: <unix-timestamp>
    nanos: 0
The <unix-timestamp> should be no more than one minute in the future or in the past. The easiest way to get the
current timestamp is to simply invoke date +%s in your shell. The nanos field should always be 0.
After you save the resource as <file-name>.yaml, apply it using omnictl apply -f <file-name>.yaml.
In a few seconds, you can check the status of the backup:
omnictl get etcdbackupstatus -o yaml
This command print per-cluster backup status. The output will be similar to this:
metadata:
  namespace: ephemeral
  type: EtcdBackupStatuses.omni.sidero.dev
  id: <cluster-name>
  version: 1
  owner: EtcdBackupController
  phase: running
spec:
  status: 1
  error: ""
  lastbackuptime:
    seconds: 1702166400
    nanos: 985220192
  lastbackupattempt:
    seconds: 1702166400
    nanos: 985220192
You can also get the overall status of the backup subsystem, where the output will be similar to this:
metadata:
  namespace: ephemeral
  type: EtcdBackupOverallStatuses.omni.sidero.dev
  id: etcdbackup-overall-status
  version: 3
  owner: EtcdBackupOverallStatusController
  phase: running
spec:
  configurationname: s3
  configurationerror: ""
  lastbackupstatus:
    status: 1
    error: ""
    lastbackuptime:
      seconds: 1702166400
      nanos: 985220192
    lastbackupattempt:
      seconds: 1702166400
      nanos: 985220192
Automatic backup
Omni also supports automatic backups. You can enable this feature by directly editing the cluster resource
Clusters.omni.sidero.dev or by using cluster templates. Let’s explore how we can do this in both ways.
Cluster templates
Enabling automatic backups using cluster templates is quite straightforward. First, you’ll need a template that resembles the following:
kind: Cluster
name: talos-default
kubernetes:
  version: v1.28.2
talos:
  version: v1.5.5
features:
  backupConfiguration:
    interval: 1h
---
kind: ControlPlane
machines:
  - 1dd4397b-37f1-4196-9c37-becef670b64a
---
kind: Workers
machines:
  - 0d1f01c3-0a8a-4560-8745-bb792e3dfaad
  - a0f29661-cd2d-4e25-a6c9-da5ca4c48d58
This is the minimal example of a cluster template for a cluster with a single-node control plane and two worker nodes.
Your machine UUIDs will likely be different, and the Kubernetes and Talos versions will probably also differ.
You will need both of these, as well as the cluster name, in your cluster template.
To obtain these, refer to the clustermachinestatus and cluster resources.
In this example, we are going to set the backup interval for the cluster to one hour. Save this template
as <file-name>.yaml. Before applying this change, we want to ensure that no automatic backup is enabled for this
cluster. To do that, let’s run the following command:
omnictl cluster template -f <file-name>.yaml diff
The Omni response will resemble the following:
--- Clusters.omni.sidero.dev(default/talos-default)
+++ Clusters.omni.sidero.dev(default/talos-default)
@@ -19,4 +19,7 @@
   features:
     enableworkloadproxy: false
     diskencryption: false
-  backupconfiguration: null
+  backupconfiguration:
+    interval:
+      seconds: 3600
+      nanos: 0
Now that we have verified that Omni does not already have an automatic backup enabled, we will apply the change:
omnictl cluster template -f <file-name>.yaml sync
If you didn’t have any backups previously, Omni will not wait for an hour and will immediately create a fresh backup. You can verify this by running the following command:
omnictl get etcdbackup --selector omni.sidero.dev/cluster=talos-default
Keep in mind that to obtain the backup status, you will need to use the label selector omni.sidero.dev/cluster
along with your cluster name. In this example it is talos-default.
NAMESPACE   TYPE         ID                         VERSION     CREATED AT
external    EtcdBackup   talos-default-1702166400   undefined   {"nanos":0,"seconds":1702166400}
Cluster resource
Another way to enable automatic backups is by directly editing the cluster resource. To do this, first, you’ll need to retrieve the cluster resource from the Omni:
omnictl get cluster talos-default -o yaml
metadata:
  namespace: default
  type: Clusters.omni.sidero.dev
  id: talos-default
  finalizers:
    - KubernetesUpgradeStatusController
    - TalosUpgradeStatusController
    - SecretsController
    - ClusterController
spec:
  installimage: ""
  kubernetesversion: 1.28.2
  talosversion: 1.5.5
  features:
    enableworkloadproxy: false
    diskencryption: false
Add fields related to the backup configuration while preserving the existing fields:
metadata:
  namespace: default
  type: Clusters.omni.sidero.dev
  id: talos-default
  finalizers:
    - KubernetesUpgradeStatusController
    - TalosUpgradeStatusController
    - SecretsController
    - ClusterController
spec:
  installimage: ""
  kubernetesversion: 1.28.2
  talosversion: 1.5.5
  features:
    enableworkloadproxy: false
    diskencryption: false
  backupconfiguration:
    interval:
      seconds: 3600
      nanos: 0
Save it to the file and apply using omnictl apply -f <file-name>.yaml. You will get the output similar to the one
above for the cluster template.
3 - Create a Machine Class
This guide shows you how to create and a machine class.
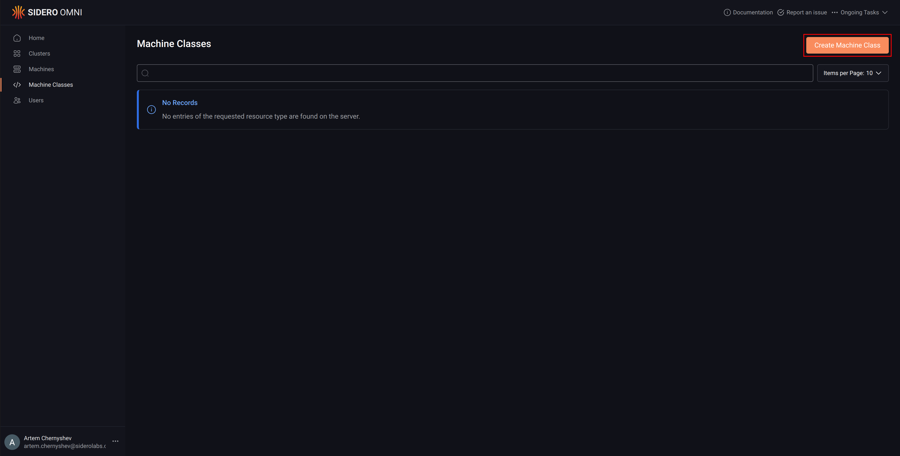
First, click the “Machine Classes” section button in the sidebar.
Next, click the “Create Machine Class” button.
Add machine query conditions by typing them manually in the input box.
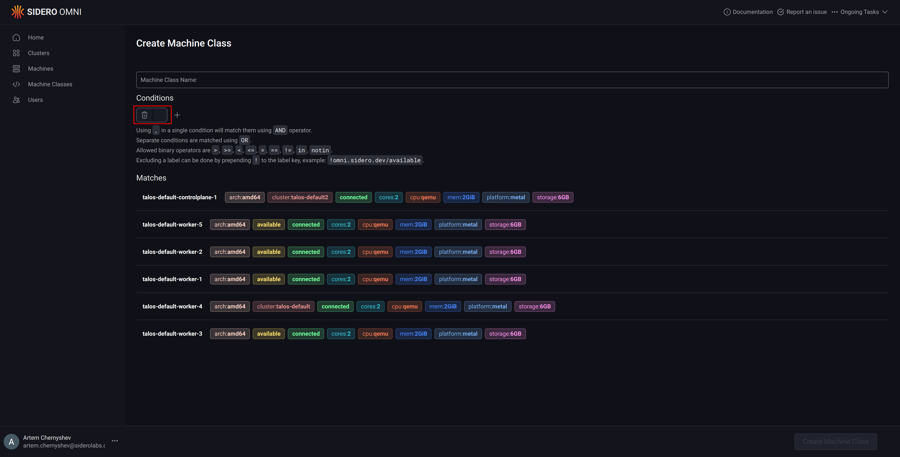
Clicking the label in the machine list will add them to the input box.
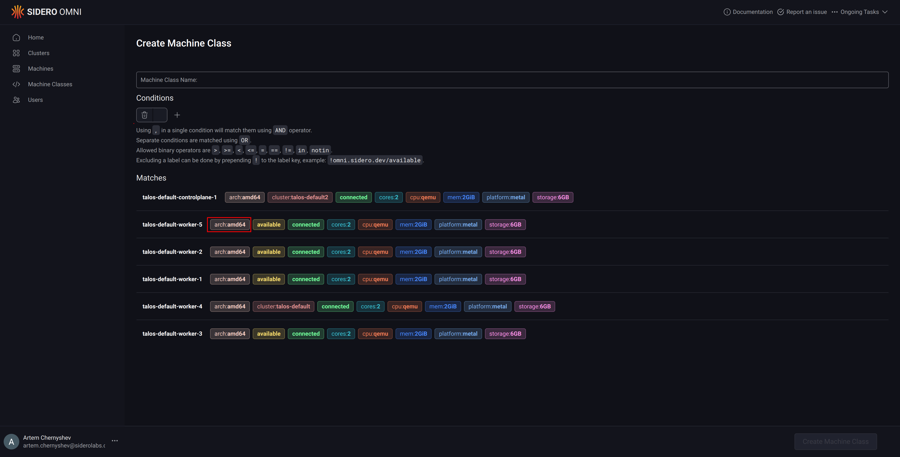
Clicking on “+” will add blocks to match the machines using boolean OR operator.
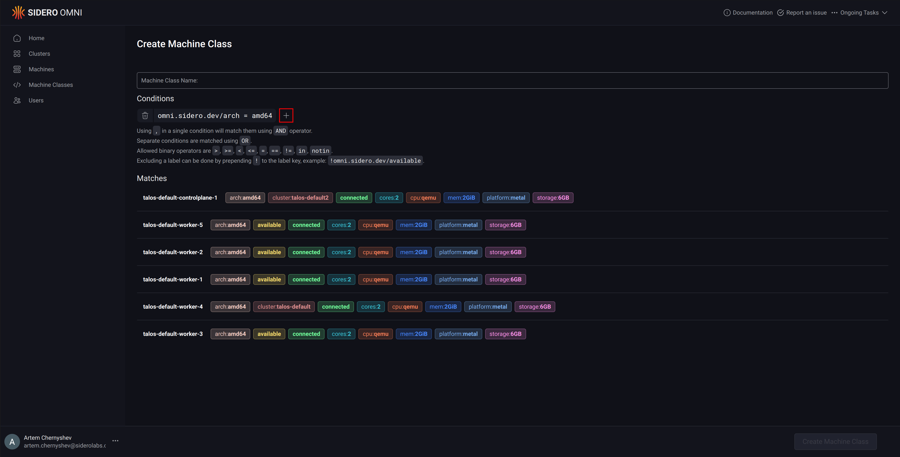
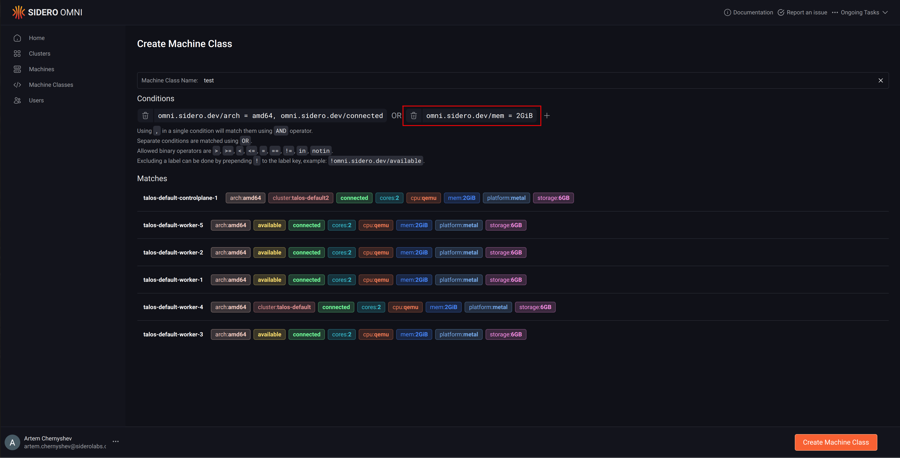
Name the machine class.
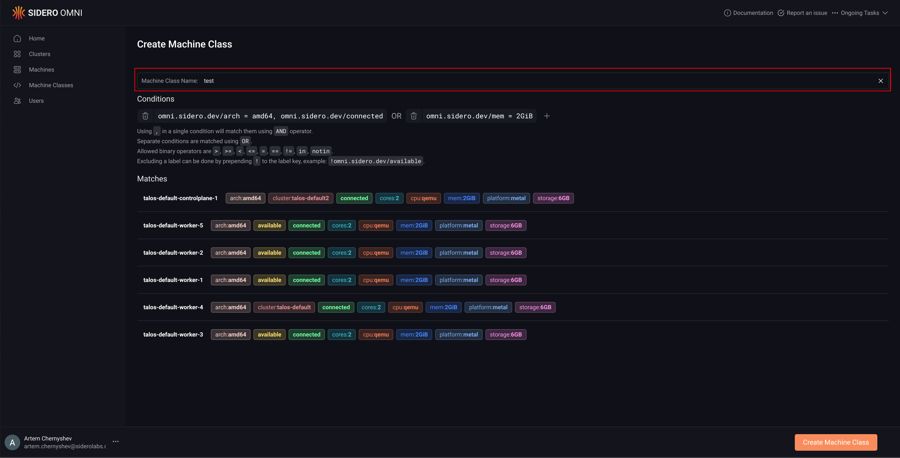
Click “Create Machine Class”.

Create a file called machine-class.yaml with the following content:
metadata:
  namespace: default
  type: MachineClasses.omni.sidero.dev
  id: test
spec:
  matchlabels:
    # matches machines with amd64 architecture and more than 2 CPUs
    - omni.sidero.dev/arch = amd64, omni.sidero.dev/cpus > 2
Create the machine class:
omnictl apply -f machine-class.yaml
4 - Expose an HTTP Service from a Cluster
This guide shows you how to expose an HTTP Kubernetes Service to be accessible from Omni Web.
Enabling Workload Service Proxying Feature
You first need to enable the workload service proxying feature on the cluster you want to expose Services from.
If you are creating a new cluster, you can enable the feature by checking the checkbox in the “Cluster Features” section:
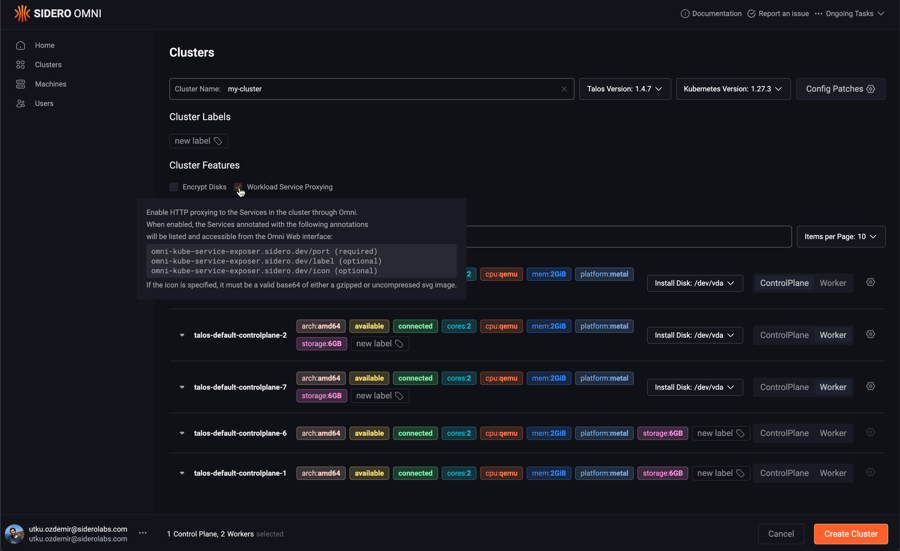
If you have an existing cluster, simply check the checkbox in the features section of the cluster overview page:
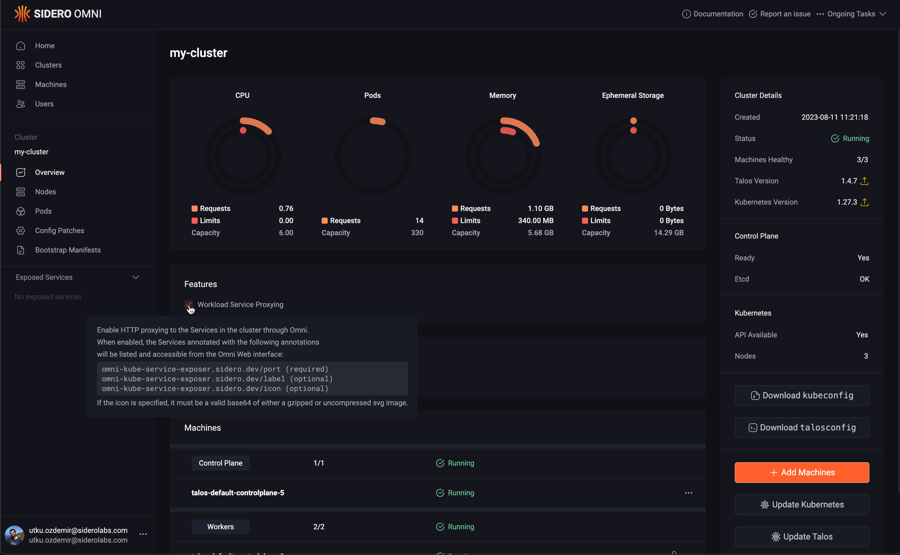
If you are using cluster templates, you can enable the feature by adding the following to the cluster template YAML:
features:
  enableWorkloadProxy: true
You will notice that the “Exposed Services” section will appear on the left menu for the cluster the feature is enabled on.
Exposing a Kubernetes Service
Let’s install a simple Nginx deployment and service to expose it.
Create the following nginx.yaml file:
apiVersion: apps/v1
kind: Deployment
metadata:
  name: workload-proxy-example-nginx
  namespace: default
spec:
  selector:
    matchLabels:
      app: workload-proxy-example-nginx
  template:
    metadata:
      labels:
        app: workload-proxy-example-nginx
    spec:
      containers:
        - name: workload-proxy-example-nginx
          image: nginx:stable-alpine-slim
---
apiVersion: v1
kind: Service
metadata:
  name: workload-proxy-example-nginx
  namespace: default
  annotations:
    omni-kube-service-exposer.sidero.dev/port: "50080"
    omni-kube-service-exposer.sidero.dev/label: Sample Nginx
    omni-kube-service-exposer.sidero.dev/icon: H4sICB0B1mQAA25naW54LXN2Z3JlcG8tY29tLnN2ZwBdU8ly2zAMvfcrWPZKwiTANWM5015yyiHdDr1kNLZsa0axvKix8/cFJbvNdCRCEvEAPDxQ8/vLSydem+Op7XeVtGCkaHbLftXuNpX8Pax1kveL+UetxY9919erZiWG/k58+/kgvjb7Xonz+Qyn182RP2DZvyjx0OyaYz30x38o8dhemqP43vfdSWi9+DDnCHFuV8O2ksmY/UWKbdNutsPfz9e2OX/pL5U0wghCvqVgqrtTJbfDsL+bzUrhM0F/3MzQGDPjlHIxH9qhaxbrtmueh7d987zbtLvLfDZtz/f1sBWrSj5aD9klhVswwdfWgLNJXR+GL6sgRwSP6QmRd53yELzCCMmRShCjqyFmLOsWwCiIKS01GJOUA0qZHQUby5ZXlsAGjkv8wmuK00A+gDfxoD1DSREQOm0teBdVgOA4wqdY1i0i+AiG4lOGbFEhg7icZWJIgCMz+It1DA/hYDQXScxVjyyohpCprBt7SswylJze49htVNxQjk6xDuSXTAs12OQgUGLWMRenLj4pTsNb11SSde/uPhmbA2U5e6c3qxBiEdhTOhhO77CIwxvJ55p7NVlN1owX+xkOJhUb3M1OTuShAZpQIoK72mtcSF5bwExLoxECjsqzssgIzdMLB2IdiPViApHbsTwhH1KNkIgFHO2tTOB54pjfXu3k4QLechmK9lCGzfm9s0XbQtmWfqa4NB0Oo1lzVtUsx6wjKxtYBcKSMkJOyGzJBbYxBM0aBypZfdBRJyDCz0zNRjXZKw0D/J75KFApFvPVTt73kv/6b0Lr9bqMp/wziz8W9M/pAwQAAA==
spec:
  selector:
    app: workload-proxy-example-nginx
  ports:
    - name: http
      port: 80
      targetPort: 80
Apply it to the cluster:
kubectl apply -f nginx.yaml
Note the following annotations on the cluster:
omni-kube-service-exposer.sidero.dev/port: "50080"
omni-kube-service-exposer.sidero.dev/label: Sample Nginx
omni-kube-service-exposer.sidero.dev/icon: H4sICB0B1mQAA25naW54LXN2Z3JlcG8tY29tLnN2ZwBdU8ly2zAMvfcrWPZKwiTANWM5015yyiHdDr1kNLZsa0axvKix8/cFJbvNdCRCEvEAPDxQ8/vLSydem+Op7XeVtGCkaHbLftXuNpX8Pax1kveL+UetxY9919erZiWG/k58+/kgvjb7Xonz+Qyn182RP2DZvyjx0OyaYz30x38o8dhemqP43vfdSWi9+DDnCHFuV8O2ksmY/UWKbdNutsPfz9e2OX/pL5U0wghCvqVgqrtTJbfDsL+bzUrhM0F/3MzQGDPjlHIxH9qhaxbrtmueh7d987zbtLvLfDZtz/f1sBWrSj5aD9klhVswwdfWgLNJXR+GL6sgRwSP6QmRd53yELzCCMmRShCjqyFmLOsWwCiIKS01GJOUA0qZHQUby5ZXlsAGjkv8wmuK00A+gDfxoD1DSREQOm0teBdVgOA4wqdY1i0i+AiG4lOGbFEhg7icZWJIgCMz+It1DA/hYDQXScxVjyyohpCprBt7SswylJze49htVNxQjk6xDuSXTAs12OQgUGLWMRenLj4pTsNb11SSde/uPhmbA2U5e6c3qxBiEdhTOhhO77CIwxvJ55p7NVlN1owX+xkOJhUb3M1OTuShAZpQIoK72mtcSF5bwExLoxECjsqzssgIzdMLB2IdiPViApHbsTwhH1KNkIgFHO2tTOB54pjfXu3k4QLechmK9lCGzfm9s0XbQtmWfqa4NB0Oo1lzVtUsx6wjKxtYBcKSMkJOyGzJBbYxBM0aBypZfdBRJyDCz0zNRjXZKw0D/J75KFApFvPVTt73kv/6b0Lr9bqMp/wziz8W9M/pAwQAAA==
To expose a service, only the omni-kube-service-exposer.sidero.dev/port annotation is required.
Its value must be a port that is unused on the nodes, such as by other exposed Services.
The annotation omni-kube-service-exposer.sidero.dev/label can be set to a human-friendly name to be displayed on the Omni Web left menu.
If not set, the default name of <service-name>.<service-namespace> will be used.
The annotation omni-kube-service-exposer.sidero.dev/icon can be set to render an icon for this service on the Omni Web left menu.
If set, valid values are:
- Either a base64-encoded SVG
- Or a base64-encoded GZIP of an SVG
To encode an SVG file icon.svg to be used for the annotation, you can use the following command:
gzip -c icon.svg | base64
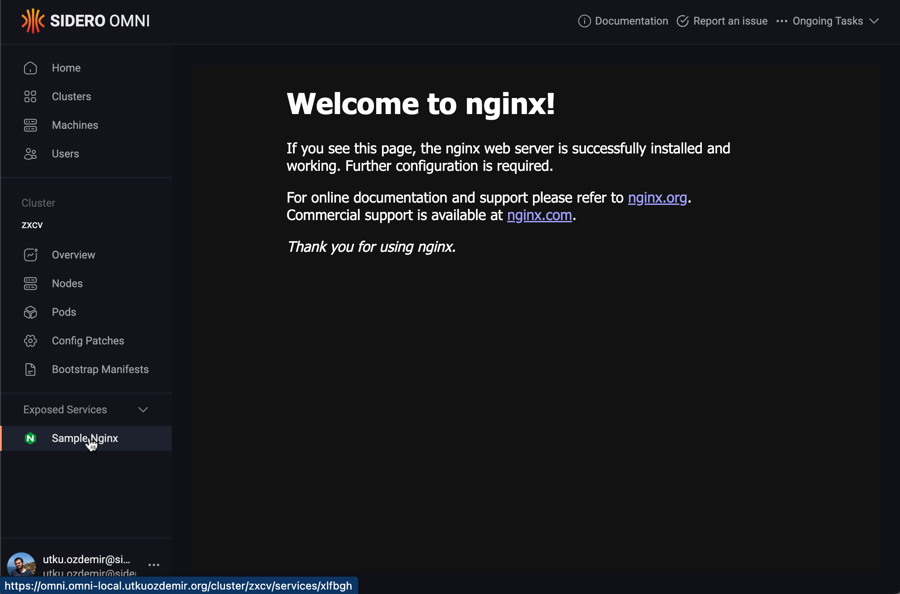
Accessing the Exposed Service
You will notice that the Service you annotated will appear under the “Exposed Services” section in Omni Web, on the left menu when the cluster is selected.
Clicking it will render the Service in Omni.
Note
This feature only works with HTTP services. Raw TCP or UDP are not supported.
The services are only accessible to the users who are authenticated to Omni
and have at least Reader level access to the cluster containing the Service.
5 - Create an Omni Service Account
This guide shows you how to create an Omni service account.
You will need omnictl installed and configured to follow this guide.
If you haven’t done so already, follow the omnictl guide.
Creating the Service Account
To create an Omni service account, use the following command:
omnictl serviceaccount create <sa-name>
The output of this command will print OMNI_ENDPOINT and OMNI_SERVICE_ACCOUNT_KEY.
Note
Store theOMNI_SERVICE_ACCOUNT_KEY securely as it will not be displayed again.
Export these variables with the printed values:
export OMNI_ENDPOINT=<output from above command>
export OMNI_SERVICE_ACCOUNT_KEY=<output from above command>
You can now use omnictl with the generated service account.
6 - Create a Service Account Kubeconfig
This guide shows you how to create a service account kubeconfig in Omni.
You need omnictl installed and configured to follow this guide.
If you haven’t done so already, follow the omnictl guide.
You also need to have a cluster created in Omni to follow this guide.
Creating the Service Account Kubeconfig
To create a service account kubeconfig, run the following command:
omnictl kubeconfig --service-account -c <cluster> --user <user> <path to kubeconfig>
Note
Replace<path to kubeconfig> with a path where the kubeconfig file should be written.
Replace <cluster> with the name of the cluster in Omni.
Replace <user> with any value you would like.
This command will create a service account token with the given username and obtain a kubeconfig file for the given cluster and username.
You can now use kubectl with the generated kubeconfig.
7 - Scale a Cluster Up or Down
Scaling Down or removing nodes from a cluster
To delete machines in a cluster, click the “Clusters” menu item on the left, then the name of the cluster you wish to delete nodes from. Click the “Nodes” menu item on the left. Now, select “Destroy” from the menu under the elipsis:

The cluster will now scale down.
Scaling Up or adding nodes to a cluster
To add machines to a cluster, click the “Cluster” menu item on the left, then the name of the cluster you wish to add nodes to. From the “Cluster Overview” tab, click the “Add Machines” button in the sidebar on the right.

From the list of available machines that is shown, identify the machine or machines you wish to add, and then click “ControlPlane” or “Worker”, to add the machine(s) with that role. You may add multiple machines in one operation. Click “Add Machines” when all machines have been selected to be added.
The cluster will now scale up.
8 - Install and Configure Omnictl
omnictl for Omni.This guide shows you how to install and configure omnictl.
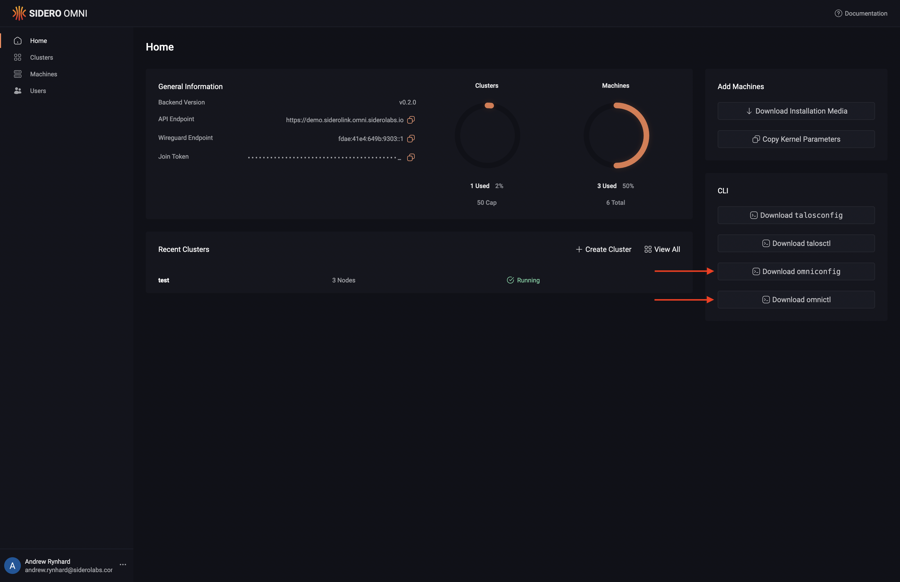
Download omnictl and omniconfig from the Omni dashboard.
Note
The downloaded binary will be named according the the selected platform and architecture (e.g.omnictl-linux-amd64).
It is left as an exercise to the user to move the downloaded binary into your PATH and make it executable.
This guide assumes the downloaded binary is named omnictl.
Add the downloaded omniconfig.yaml to the default location to use it with omnictl:
cp omniconfig.yaml ~/.config/omni/config
If you would like to merge the omniconfig.yaml with an existing configuration, use the following command:
omnictl config merge ./omniconfig.yaml
List the contexts to verify that the omniconfig was added:
$ omnictl config contexts
CURRENT   NAME         URL
          ...
          example      https://example.omni.siderolabs.io/
          ...
Run omnictl for the first time to perform initial authentication using a web browser:
omnictl get clusters
If the browser window does not open automatically, it can be opened manually by copying and pasting the URL into a web browser:
BROWSER=echo omnictl get clusters
9 - Use Kubectl With Omni
With an Omni managed cluster, you use kubectl as with any other Kubernetes cluster, with the caveat that you must use the kubeconfig file that you download from Omni, and have the OIDC plug-in installed for your kubectl.
All Kubernetes kubectl commands are routed through the API endpoint created by Omni, and Omni validates access through the configured OIDC provider or other user authorization mechanism.
This ensures your Kubernetes cluster is safe - unlike other systems, mere possession of a kubeconfig grants no access - the user also has be valid in the configured authentication system of Omni.
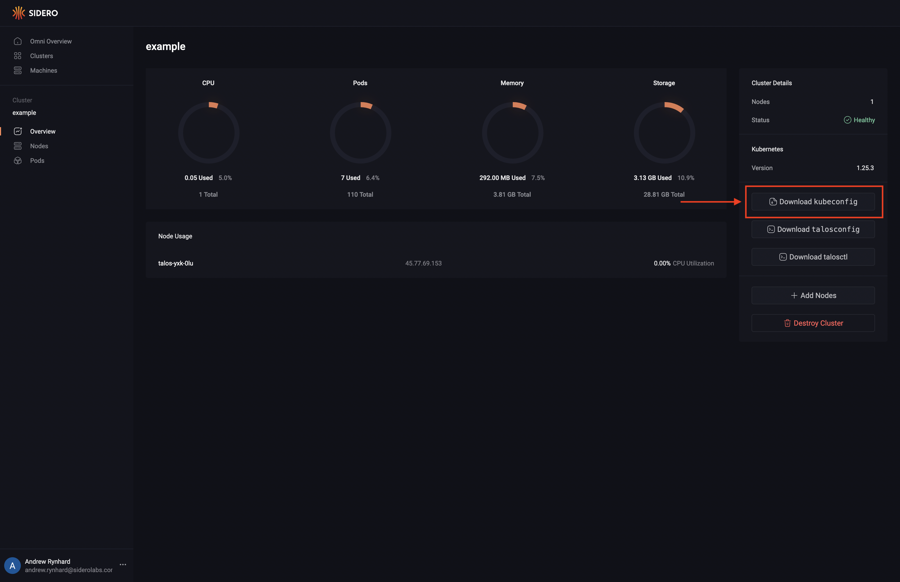
Download the KubeConfig file
Navigate to the clusters page by clicking on the “Clusters” button in the sidebar.
Click on the cluster and download the kubeconfig from the cluster dashboard.
The downloaded file will reflect the name of the cluster.
Install the OIDC plug in
Install the oidc-login plugin per the official documentation: https://github.com/int128/kubelogin#getting-started
Access the cluster with kubectl
kubectl --kubeconfig ./talos-default-kubeconfig.yaml get nodes
Be sure you use the name of the downloaded kubeconfig file, which will vary with the name of the cluster.
The first time you use the kubectl command to query a cluster, a browser window will open requiring you to authenticate with your identity provider.
If you get a message
error: unknown command "oidc-login" for "kubectl" Unable to connect to the serverthen you need to install the oidc-login plugin as noted above, and ensure it is in your $PATH.
OIDC authentication over SSH
If you need to use kubectl, talosctl, or omnictl on a remote host over SSH you may need a way to forward your local client traffic to the remote host where kubectl-oidc_login is installed.
To do that you can tunnel the ports over SSH when you connect to the host.
This command will open a tunnel using the default ports oidc-login attempts to use.
ssh -L 8000:localhost:8000 -L 18000:localhost:18000 $HOST
You can run this in a separate terminal temporarily while you authenticate your CLI tools.
If you want to have the port forwarding happen automatically every time you connect to the host you should update your ~/.ssh/config file to contain the following lines for the host.
Host myhost
  LocalForward 8000 127.0.0.1:8000
  LocalForward 18000 127.0.0.1:18000
You will also need to disable automatic browser opening because it will likely try to open a browser on the SSH host or fail to open if one is not installed.
Do that by adding --skip-open-browser in your $KUBECONFIG file.
      args:
        - oidc-login
        - get-token
        - --oidc-issuer-url=https://$YOUR_ENDPOINT.omni.siderolabs.io/oidc
        - --oidc-client-id=native
        - --oidc-extra-scope=cluster:not-eks
        - --skip-open-browser
      command: kubectl
      env: null
10 - Create a Cluster
This guide shows you how to create a cluster from registered machines.
First, click the “Clusters” section button in the sidebar. Next, click the “Create Cluster” button.
You may name the cluster, as well specify the version of Talos Linux and Kubernetes that the cluster should be created with. You may also enable optional cluster features, such as Disk Encryption or Workload Service Proxying.
Note that disk encryption can only be enabled during cluster creation. Enabling this checkbox will configure the cluster to use Omni as a Key Management Server, and local disk access will not the possible unless the machine is connected to Omni.
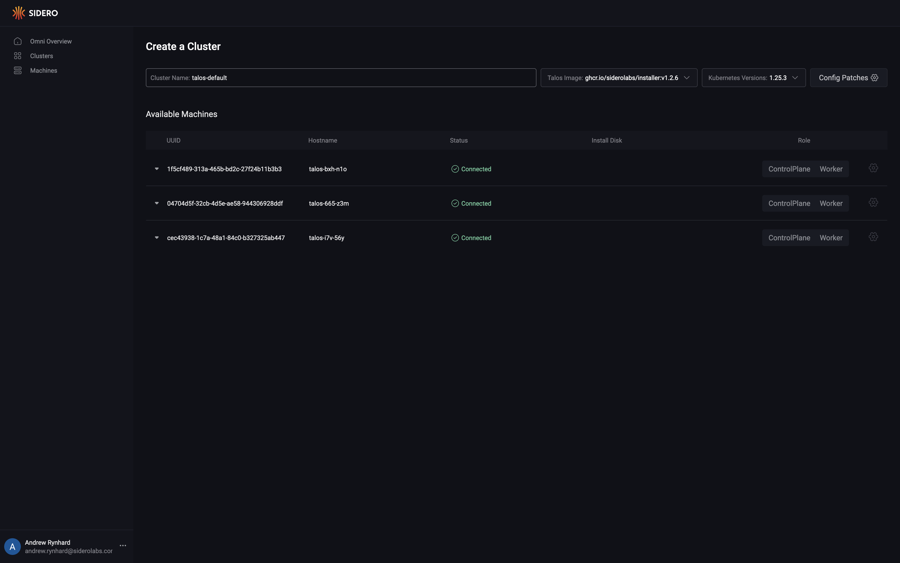
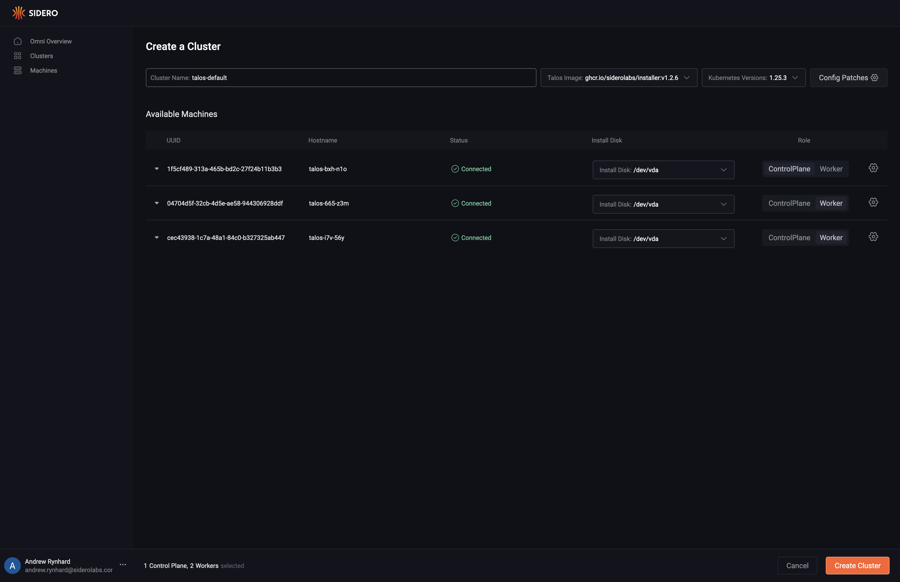
Select the role for each machine you would like to create a cluster from. Now that each machine has a role, choose the install disk from the dropdown menu for each machine. Finally, click “Create Cluster”
Create a file called cluster.yaml with the following content:
kind: Cluster
name: example
kubernetes:
  version: v1.27.0
talos:
  version: v1.5.2
---
kind: ControlPlane
machines:
  - <control plane machine UUID>
---
kind: Workers
machines:
  - <worker machine UUID>
---
kind: Machine
name: <control plane machine UUID>
install:
  disk: /dev/<disk>
---
kind: Machine
name: <worker machine UUID>
install:
  disk: /dev/<disk>
If enabling optional features such as disk encryption, add them to the Cluster document e.g.:
kind: Cluster
name: example
kubernetes:
  version: v1.27.0
talos:
  version: v1.5.2
features:
  diskEncryption: true
Note
Be sure to update the UUIDs and install disks with the UUIDs and disks of the machines in your account.
Now, validate the document:
omnictl cluster template validate -f cluster.yaml
Create the cluster:
omnictl cluster template sync -f cluster.yaml --verbose
Finally, wait for the cluster to be up:
omnictl cluster template status -f cluster.yaml
Create a file called cluster.yaml with the following content:
kind: Cluster
name: example
kubernetes:
  version: v1.28.0
talos:
  version: v1.5.4
---
kind: ControlPlane
machineClass:
  name: control-planes
  size: 1
---
kind: Workers
machineClass:
  name: workers
  size: 1
---
kind: Workers
name: secondary
machineClass:
  name: secondary-workers
  size: unlimited
Be sure to create machine classes control-planes, workers and secondary-workers beforehand. See machine classes how-to.
Now, validate the document:
omnictl cluster template validate -f cluster.yaml
Create the cluster:
omnictl cluster template sync -f cluster.yaml --verbose
Finally, wait for the cluster to be up:
omnictl cluster template status -f cluster.yaml
11 - Create a Hybrid Cluster
This guide shows you how to create a cluster consisting of any combination of bare metal, cloud virtual machines, on-premise virtual machines, or SBCs, using KubeSpan. KubeSpan is a feature of Talos Linux that provides full node-to-node network encryption with WireGuard, and enables Kubernetes to operate securely even when machines in the cluster are on different networks.
Refer to the general guide on creating a cluster to get started. To create a hybrid cluster, navigate to the cluster, then apply the following cluster patch by clicking on “Config Patches”, and create a new patch with the target of “Cluster”:
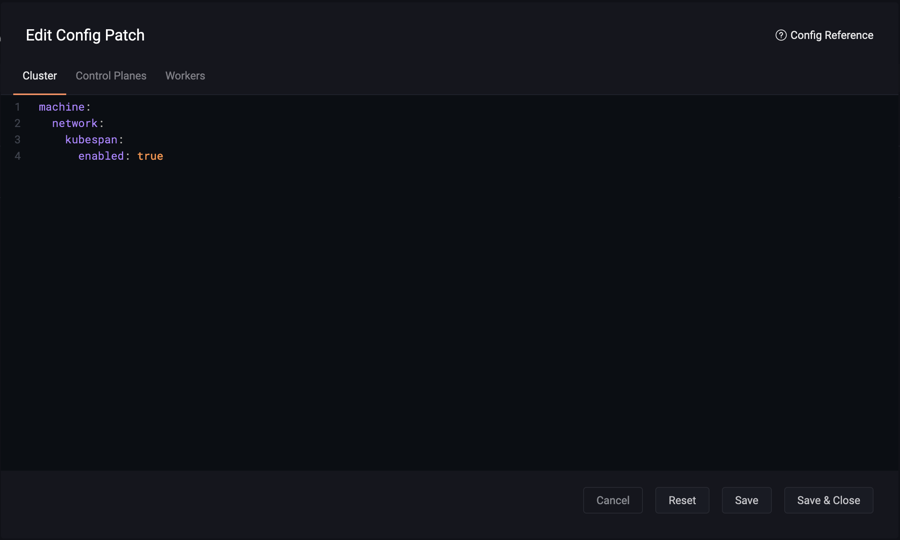
machine:
  network:
    kubespan:
      enabled: true
All machines in this cluster will have this patch applied to them, and use WireGuard encryption for all node-to-node traffic.
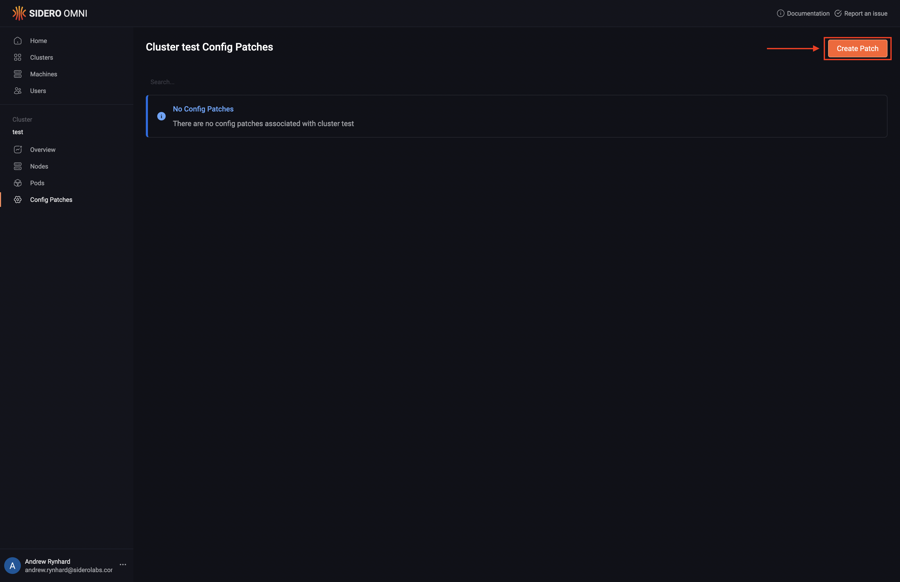
12 - Create a Patch For Cluster Machines
Omni allows you to create patches and target the patches to all members of a cluster; all control plane nodes; all worker nodes; or specific machines. Upon logging in, click the “Clusters” menu item on the left. Now, select “Config Patches” from the menu under the ellipsis:
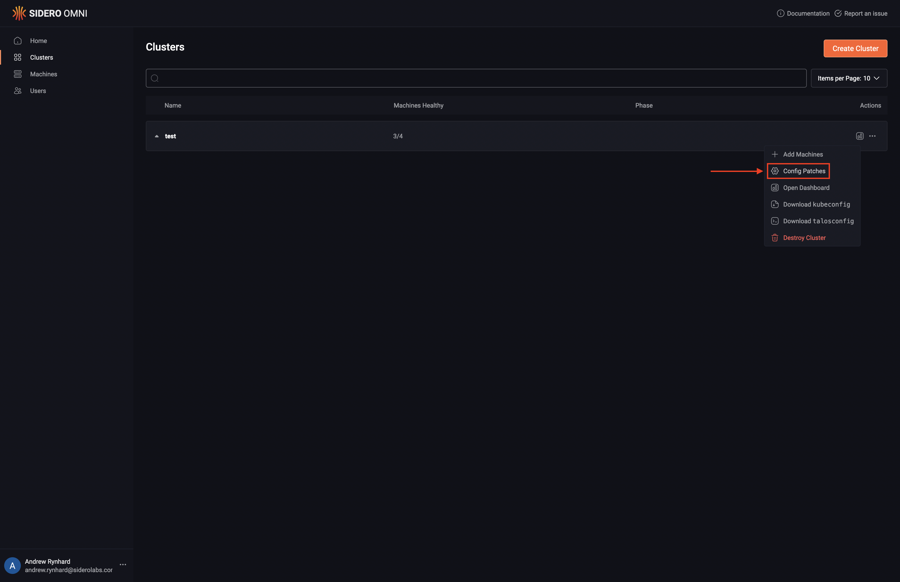
Next, click “Create Patch”:
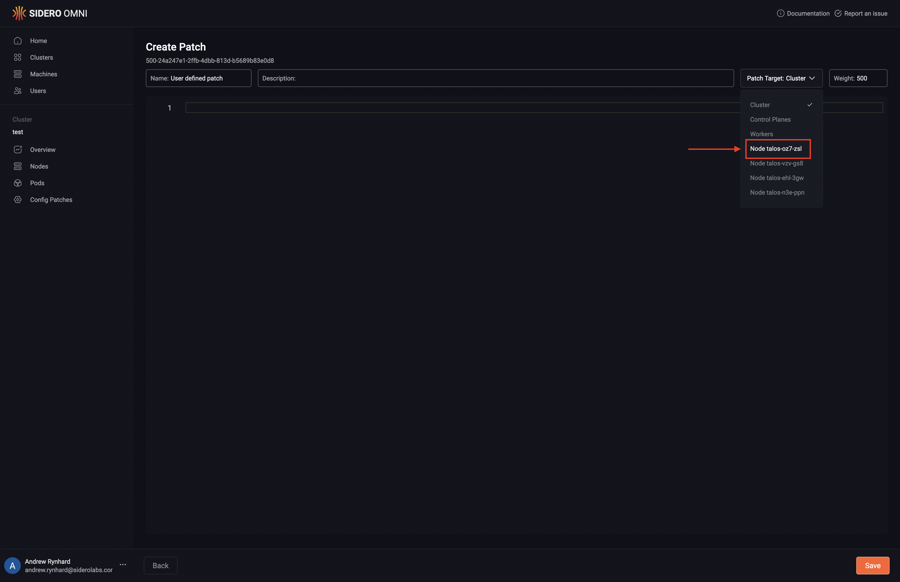
Pick the specific machine or class of machines from the “Patch Target” dropdown:
Type in the desired config patch:
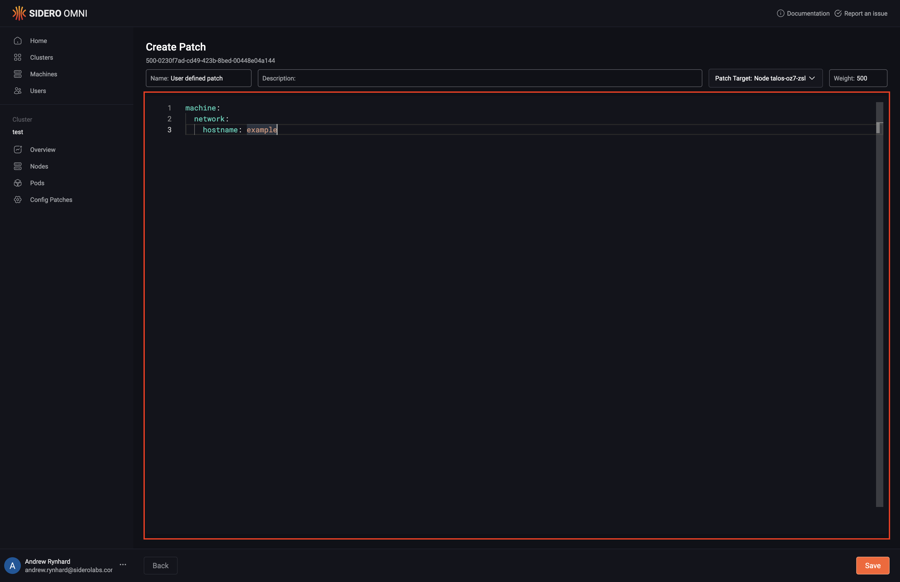
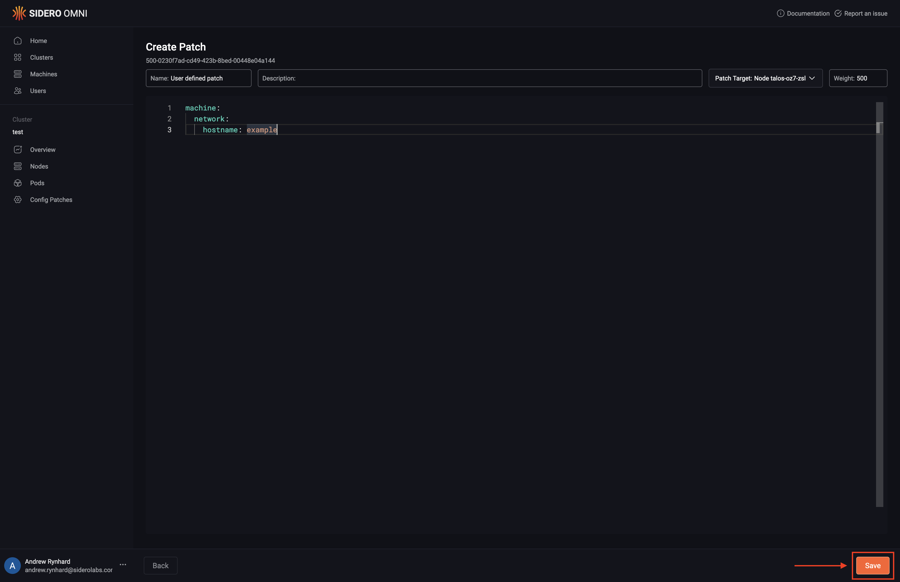
Click “Save” to create the config patch:
For an example of a patch to enable node-to-node network encryption - the KubeSpan feature of Talos Linux - see Creating a Hybrid Cluster.
13 - Export a Cluster Template from a Cluster Created in the UI
This guide shows you how to export a cluster template from a cluster created in the UI. This is useful when you want to switch a cluster from being manually managed to being managed by cluster templates (i.e. via the CLI, to be used in CI automation).
Exporting the Cluster Template
To export a cluster, run the following command:
omnictl cluster template export -c my-cluster -o my-cluster-exported-template.yaml
It will export the template for the cluster with name my-cluster into the file my-cluster-exported-template.yaml.
If you inspect the exported template, you will see an output like the following:
kind: Cluster
name: my-cluster
labels:
  my-label: my-value
kubernetes:
  version: v1.27.8
talos:
  version: v1.5.5
---
kind: ControlPlane
machines:
  - 1e3133f4-fb7a-4b62-bd4f-b792e2df24e2
  - 5439f561-f09e-4259-8788-9ab835bb9922
  - 63564547-c9cb-4a30-a54a-8f95a29d66a5
---
kind: Workers
machines:
  - 4b46f512-55d0-482c-ac48-cd916b62b74e
patches:
  - idOverride: 500-04e39280-4b36-435e-bedc-75c4ab340a80
    annotations:
      description: Enable verbose logging for kubelet
      name: kubelet-verbose-log
    inline:
      machine:
        kubelet:
          extraArgs:
            v: "4"
---
kind: Machine
name: 1e3133f4-fb7a-4b62-bd4f-b792e2df24e2
install:
  disk: /dev/vda
---
kind: Machine
name: 4b46f512-55d0-482c-ac48-cd916b62b74e
---
kind: Machine
name: 5439f561-f09e-4259-8788-9ab835bb9922
---
kind: Machine
name: 63564547-c9cb-4a30-a54a-8f95a29d66a5
Using the Exported Cluster Template to Manage the Cluster
You can now use this template to manage the cluster - edit the template as needed and sync it using the CLI:
omnictl cluster template sync -f my-cluster-exported-template.yaml
Check the sync status:
omnictl cluster template status -f my-cluster-exported-template.yaml
14 - Install Talos System Extensions
On the overview page click “Download Installation Media” button:
Select the list of extensions you want to be installed on the machine, Talos version and installation media type:
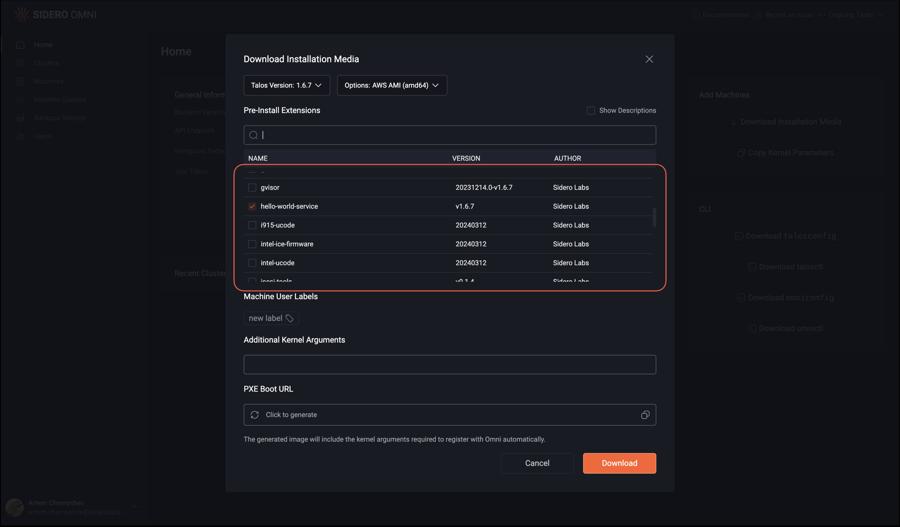
Click “Download”:
Boot the machine with that installation media. It will have all extensions installed.
Note
Updating extensions after the cluster is created is possible only when using CLI.
Create a file called cluster.yaml with the following content:
kind: Cluster
name: example
kubernetes:
  version: v1.29.1
talos:
  version: v1.6.7
systemExtensions:
  - siderolabs/hello-world-service
---
kind: ControlPlane
machines:
  - <control plane machine UUID>
---
kind: Workers
machines:
  - <worker machine UUID>
---
kind: Machine
name: <control plane machine UUID>
---
kind: Machine
name: <worker machine UUID>
install:
  disk: /dev/<disk>
systemExtensions:
  - siderolabs/nvidia-container-toolkit
  - siderolabs/nvidia-fabricmanager
  - siderolabs/nvidia-open-gpu-kernel-modules
  - siderolabs/nonfree-kmod-nvidia
Now, validate the document:
omnictl cluster template validate -f cluster.yaml
Create the cluster:
omnictl cluster template sync -f cluster.yaml --verbose
Finally, wait for the cluster to be up:
omnictl cluster template status -f cluster.yaml
The cluster will have hello-world-service extension installed on the control plane and all nvidia drivers on the worker.
15 - Install talosctl
This guide shows you how to install talosctl.
Run the following:
curl -sL https://talos.dev/install | sh
You now have talosctl installed.
Please note that because Omni manages the state of the Talos nodes, and protects the security of the Kubernetes and Talos credentials, some
talosctlcommands (such astalosctl reset) will returnPermissionDeniedon Omni managed clusters - such operations must be done through the Omni UI or API calls.
16 - Manage Access Policies (ACLs)
This guide will show how to give the user support@example.com full access to the staging cluster but limited access to the production cluster.
Create an AccessPolicy resource
Create a local file acl.yaml:
metadata:
  namespace: default
  type: AccessPolicies.omni.sidero.dev
  id: access-policy
spec:
  rules:
    - users:
        - support@example.com
      clusters:
        - staging
      role: Operator
      kubernetes:
        impersonate:
          groups:
            - system:masters
    - users:
        - support@example.com
      clusters:
        - production
      role: Reader
      kubernetes:
        impersonate:
          groups:
            - my-app-read-only
  tests:
    - name: support engineer has full access to staging cluster
      user:
        name: support@example.com
      cluster:
        name: staging
      expected:
        role: Operator
        kubernetes:
          impersonate:
            groups:
              - system:masters
    - name: support engineer has read-only access to my-app namespace in production cluster
      user:
        name: support@example.com
      cluster:
        name: production
      expected:
        role: Reader
        kubernetes:
          impersonate:
            groups:
              - my-app-read-only
As an Omni admin, apply this ACL using omnictl:
omnictl apply -f acl.yaml
When users interact with Omni API or UI, they will be assigned to the role specified in the ACL.
When users access the Kubernetes cluster through Omni, they will have the groups specified in the ACL.
Kubernetes RBAC then can be used to grant permissions to these groups.
Note
Only the users who have the Omni role Admin can manage ACLs.
Users who have the Omni role Operator or above are assigned to the Kubernetes role system:masters by default, in addition to the ACLs.
Create Kubernetes RBAC resources
Locally, create rbac.yaml with a Namespace called my-app, and a Role & RoleBinding to give access to the my-app-read-only group:
apiVersion: v1
kind: Namespace
metadata:
  name: my-app
---
apiVersion: rbac.authorization.k8s.io/v1
kind: Role
metadata:
  name: read-only
  namespace: my-app
rules:
  - apiGroups: ["", "extensions", "apps", "batch", "autoscaling"]
    resources: ["*"]
    verbs: ["get", "watch", "list"]
---
apiVersion: rbac.authorization.k8s.io/v1
kind: RoleBinding
metadata:
  name: read-only
  namespace: my-app
roleRef:
  apiGroup: rbac.authorization.k8s.io
  kind: Role
  name: read-only
subjects:
  - kind: Group
    name: my-app-read-only
    apiGroup: rbac.authorization.k8s.io
As the cluster admin, apply the manifests to the Kubernetes cluster production:
kubectl apply -f rbac.yaml
Test the access
Try to access the cluster with a kubeconfig generated by the user support@example.com:
kubectl get pods -n my-app
The user should be able to list pods in the my-app namespace because of the Role and RoleBinding created above.
Try to list pods in another namespace:
kubectl get pod -n default
The user should not be able to list pods in namespace default.
Warning
If the user support@example.com has the Omni role Operator or above assigned, they will have system:masters role in Kubernetes as well as the my-app-read-only role.
Therefore, they will still be able to list pods in all namespaces.
17 - Restore Etcd of a Cluster Managed by Cluster Templates to an Earlier Snapshot
This guide shows you how to restore a cluster’s etcd to an earlier snapshot. This is useful when you need to revert a cluster to an earlier state.
This tutorial has the following requirements:
- The CLI tool
omnictlmust be installed and configured. - The cluster which you want to restore must still exist (not deleted from Omni) and have backups in the past.
- The cluster must be managed using cluster templates (not via the UI).
Finding the Cluster’s UUID
To find the cluster’s UUID, run the following command, replacing my-cluster with the name of your cluster:
omnictl get clusteruuid my-cluster
The output will look like this:
NAMESPACE   TYPE          ID              VERSION   UUID
default     ClusterUUID   my-cluster      1         bb874758-ee54-4d3b-bac3-4c8349737298
Note the UUID column, which contains the cluster’s UUID.
Finding the Snapshot to Restore
List the available snapshots for the cluster:
omnictl get etcdbackup -l omni.sidero.dev/cluster=my-cluster
The output will look like this:
NAMESPACE   TYPE         ID                         VERSION     CREATED AT                         SNAPSHOT
external    EtcdBackup   my-cluster-1701184522   undefined   {"nanos":0,"seconds":1701184522}   FFFFFFFF9A99FBF6.snapshot
external    EtcdBackup   my-cluster-1701184515   undefined   {"nanos":0,"seconds":1701184515}   FFFFFFFF9A99FBFD.snapshot
external    EtcdBackup   my-cluster-1701184500   undefined   {"nanos":0,"seconds":1701184500}   FFFFFFFF9A99FC0C.snapshot
The SNAPSHOT column contains the snapshot name which you will need to restore the cluster. Let’s assume you want to restore the cluster to the snapshot FFFFFFFF9A99FBFD.snapshot.
Deleting the Existing Control Plane
To restore the cluster, we need to first delete the existing control plane of the cluster. This will take the cluster into the non-bootstrapped state. Only then we can create the new control plane with the restored etcd.
Use the following command to delete the control plane, replacing my-cluster with the name of your cluster:
omnictl delete machineset my-cluster-control-planes
Creating the Restore Template
Edit your cluster template manifest template-manifest.yaml,
edit the list of control plane machines for your needs,
and add the bootstrapSpec section to the control plane, with cluster UUID and the snapshot name we found above:
kind: Cluster
name: my-cluster
kubernetes:
  version: v1.28.2
talos:
  version: v1.5.5
---
kind: ControlPlane
machines:
  - 430d882a-51a8-48b3-ae00-90c5b0b5b0b0
  - e865efbc-25a1-4436-bcd9-0a431554e328
  - 820c2b44-568c-461e-91aa-c2fc228c0b2e
bootstrapSpec:
  clusterUUID: bb874758-ee54-4d3b-bac3-4c8349737298 # The cluster UUID we found above
  snapshot: FFFFFFFF9A99FBFD.snapshot # The snapshot name we found above
---
kind: Workers
machines:
  - 18308f52-b833-4376-a7c8-1cb9de2feafd
  - 79f8db4d-3b6b-49a7-8ac4-aa5d2287f706
Syncing the Template
To sync the template, run the following command:
omnictl cluster template sync -f template-manifest.yaml
omnictl cluster template status -f template-manifest.yaml
After the sync, your cluster will be restored to the snapshot you specified.
Restarting Kubelet on Worker Nodes
To ensure a healthy cluster operation, the kubelet needs to be restarted on all worker nodes.
Note
For this step, you need talosctl to be installed and talosconfig to be configured for this cluster. You can download talosconfig using the Web UI or by
omnictl talosconfig -c my-cluster
Get the IDs of the worker nodes:
omnictl get clustermachine -l omni.sidero.dev/role-worker,omni.sidero.dev/cluster=my-cluster
The output will look like this:
NAMESPACE   TYPE             ID                                     VERSION
default     ClusterMachine   26b87860-38b4-400f-af72-bc8d26ab6cd6   3
default     ClusterMachine   2f6af2ad-bebb-42a5-b6b0-2b9397acafbc   3
default     ClusterMachine   5f93376a-95f6-496c-b4b7-630a0607ac7f   3
default     ClusterMachine   c863ccdf-cdb7-4519-878e-5484a1be119a   3
Gather the IDs in this output, and issue a kubelet restart on them using talosctl:
talosctl -n 26b87860-38b4-400f-af72-bc8d26ab6cd6 service kubelet restart
talosctl -n 2f6af2ad-bebb-42a5-b6b0-2b9397acafbc service kubelet restart
talosctl -n 5f93376a-95f6-496c-b4b7-630a0607ac7f service kubelet restart
talosctl -n c863ccdf-cdb7-4519-878e-5484a1be119a service kubelet restart
18 - File an Issue
This guide shows you file an issue for Omni.
Click on the “Report an issue” button in the header:

Now, click on the “New issue” button:
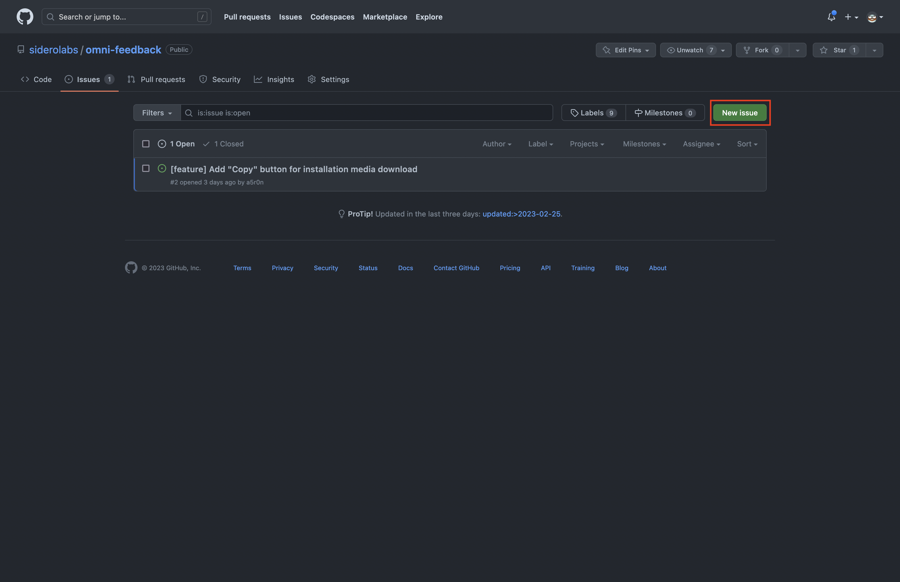
Choose the issue type, fill in the details, and submit the issue.
19 - Run Omni on your own infrastructure
Omni is available as a hosted version operated by Sidero Labs, but can also be self-hosted. This is appropriate for:
- air-gapped deployments
- industries with strict security and compliance concerns
- home use.
Note that using Omni for production use requires a commercial license. Contact sales@SideroLabs.com for more information. Non-production use, such as using Omni for a home lab, does not require a license.
19.1 - Deploy Omni On-prem
This guide shows you how to deploy Omni on-prem. This guide assumes that Omni will be deployed on an Ubuntu machine. Small differences should be expected when using a different OS.
For SAML integration sections, this guide assumes Azure AD will be the provider for SAML.
Note
Omni is available via a Business Source License which allows free installations in non-production environments. If you would like to deploy Omni for production use please contact Sidero sales. If you would like to subscribe to the hosted version of Omni please see the SaaS pricing.Prereqs
There are several prerequisites for deploying Omni on-prem.
Install Docker
Install Docker according to the Ubuntu installation guide here.
Generate Certs
On-prem Omni will require valid SSL certificates. This means that self-signed certs will not work as of the time of this writing. Generating certificates is left as an exercise to the user, but here is a rough example that was tested using DigitalOcean’s DNS integration with certbot to generate certificates. The process should be very similar for other providers like Route53.
# Install certbot
$ sudo snap install --classic certbot

# Allow for root access
$ sudo snap set certbot trust-plugin-with-root=ok

# Install DNS provider
$ snap install certbot-dns-<provider>

# Create creds file with API tokens
$ echo '<creds example' > creds.ini

# Create certs for desired domain
$ certbot certonly --dns-<provider> -d <domain name for onprem omni>
Configure Authentication
Auth0
First, you will need an Auth0 account.
On the account level, configure “Authentication - Social” to allow GitHub and Google login.
Create an Auth0 application of the type “single page web application”.
Configure the Auth0 application with the following:
- Allowed callback URLs:
https://<domain name for onprem omni> - Allowed web origins:
https://<domain name for onprem omni> - Allowed logout URLs:
https://<domain name for onprem omni>
Disable username/password auth on “Authentication - Database - Applications” tab.
Enable GitHub and Google login on the “Authentication - Social” tab.
Enable email access in the GitHub settings.
Take note of the following information from the Auth0 application:
- Domain
- Client ID
SAML Identity Providers
Create Etcd Encryption Key
Generate a GPG key:
gpg --quick-generate-key "Omni (Used for etcd data encryption) how-to-guide@siderolabs.com" rsa4096 cert never
Find the fingerprint of the generated key:
gpg --list-secret-keys
Using the fingerprint, add an encryption subkey and export:
gpg --quick-add-key <fingerprint> rsa4096 encr never
gpg --export-secret-key --armor how-to-guide@siderolabs.com > omni.asc
Note
Do not add passphrases to keys during creation.Generate UUID
It is important to generate a unique ID for this Omni deployment. It will also be necessary to use this same UUID each time you “docker run” your Omni instance.
Generate a UUID with:
export OMNI_ACCOUNT_UUID=$(uuidgen)
Deploy Omni
Running Omni is a simple docker run, with some slight differences in flags for Auth0 vs. SAML authentication.
Auth0
docker run \
  --net=host \
  --cap-add=NET_ADMIN \
  -v $PWD/etcd:/_out/etcd \
  -v <path to TLS certificate>:/tls.crt \
  -v <path to TLS key>:/tls.key \
  -v $PWD/omni.asc:/omni.asc \
  ghcr.io/siderolabs/omni:<tag> \
    --account-id=${OMNI_ACCOUNT_UUID} \
    --name=onprem-omni \
    --cert=/tls.crt \
    --key=/tls.key \
    --siderolink-api-cert=/tls.crt \
    --siderolink-api-key=/tls.key \
    --private-key-source=file:///omni.asc \
    --event-sink-port=8091 \
    --bind-addr=0.0.0.0:443 \
    --siderolink-api-bind-addr=0.0.0.0:8090 \
    --k8s-proxy-bind-addr=0.0.0.0:8100 \
    --advertised-api-url=https://<domain name for onprem omni>/ \
    --siderolink-api-advertised-url=https://<domain name for onprem omni>:8090/ \
    --siderolink-wireguard-advertised-addr=<ip address of the host running Omni>:50180 \
    --advertised-kubernetes-proxy-url=https://<domain name for onprem omni>:8100/ \
    --auth-auth0-enabled=true \
    --auth-auth0-domain=<Auth0 domain> \
    --auth-auth0-client-id=<Auth0 client ID> \
    --initial-users=<email address>
Note
Thesiderolink-wireguard-advertised-addr must point to an IP, not the domain name.
Note
Note that you can omit the--cert, --key, --siderolink-api-cert, and --siderolink-api-key flags to run Omni insecurely.
Configuration options are available in the help menu (--help).
SAML
docker run \
  --net=host \
  --cap-add=NET_ADMIN \
  -v $PWD/etcd:/_out/etcd \
  -v <path to full chain TLS certificate>:/tls.crt \
  -v <path to TLS key>:/tls.key \
  -v $PWD/omni.asc:/omni.asc \
  ghcr.io/siderolabs/omni:<tag> \
    --account-id=${OMNI_ACCOUNT_UUID} \
    --name=onprem-omni \
    --cert=/tls.crt \
    --key=/tls.key \
    --siderolink-api-cert=/tls.crt \
    --siderolink-api-key=/tls.key \
    --private-key-source=file:///omni.asc \
    --event-sink-port=8091 \
    --bind-addr=0.0.0.0:443 \
    --siderolink-api-bind-addr=0.0.0.0:8090 \
    --k8s-proxy-bind-addr=0.0.0.0:8100 \
    --advertised-api-url=https://<domain name for onprem omni>/ \
    --siderolink-api-advertised-url=https://<domain name for onprem omni>:8090/ \
    --siderolink-wireguard-advertised-addr=<ip address of the host running Omni>:50180 \
    --advertised-kubernetes-proxy-url=https://<domain name for onprem omni>:8100/ \
    --auth-saml-enabled=true \
    --auth-saml-url=<app federation metadata url copied during Azure AD setup>
Note
In a default setup, the first user that logs in via SAML will be the “admin”. All subsequent users will receive a read-only role and may need to be granted additional access by the admin user from the “Users” tab in Omni.Note
Thesiderolink-wireguard-advertised-addr must point to an IP, not the domain name.
Note
Note that you can omit the--cert, --key, --siderolink-api-cert, and --siderolink-api-key flags to run Omni insecurely.
Configuration options are available in the help menu (--help).
19.2 - Configure Keycloak for Omni
-
Log in to Keycloak.
-
Create a realm.
- In the upper left corner of the page, select the dropdown where it says master

- Fill in the realm name and select create

- Find the realm metadata.
- In the realm settings, there is a link to the metadata needed for SAML under Endpoints.
- Copy the link or save the data to a file. It will be needed for the installation of Omni.

- Create a client
- Select the Clients tab on the left

- Fill in the General Settings as shown in the example below. Replace the hostname in the example with your own Omni hostname or IP.
- Client type
- Client ID
- Name

- Fill in the Login settings as shown in the example below. Replace the hostname in the example with your own Omni hostname or IP.
- Root URL
- Valid redirect URIs
- Master SAML PRocessing URL

- Modify the Signature and Encryption settings.
- Sign documents: off
- Sign assertions: on

- Set the Client signature required value to off.

- Modify Client Scopes

- Select Add predefined mapper.

- The following mappers need to be added because they will be used by Omni will use these attributes for assigning permissions.
- X500 email
- X500 givenName
- X500 surname

- Add a new user (optional)
- If Keycloak is being used as an Identity Provider, users can be created here.

- Enter the user information and set the Email verified to Yes

- Set a password for the user.

19.2.1 -
how-to-configure-keycloak-for-omni
19.3 - Back Up On-prem Omni Database
This guide shows you how to back up the database of an on-prem Omni instance.
Omni uses etcd as its database.
There are 2 operating modes for etcd: embedded and external.
When Omni is run with --etcd-embedded=true flag, it will configure the embedded etcd server to
listen the addresses specified by the --etcd-endpoints flag (http://localhost:2379 by default).
In the same host where Omni is running (in Docker, --network=host needs to be used), you can use
the etcdctl command to back up the database:
etcdctl --endpoints http://localhost:2379 snapshot save snapshot.db
The command will save the snapshot of the database to the snapshot.db file.
It is recommended to periodically (e.g. with a cron job) take snapshots and store them in a safe location, like an S3 bucket.
Note
When --etcd-embedded is set to false, the database is external and not managed by Omni.
It still needs to be regularly backed up. For more info, see etcd disaster recovery.
19.4 - How to expose Omni with Nginx (HTTPS)
Omni deployment configuration
You need to deploy an omni instance the how to deploy omni on prem guide, with the following flags set:
--name=$OMNI_NAME
--private-key-source=file:///omni.asc
--advertised-api-url=https://$OMNI_DOMAIN/
--bind-addr=127.0.0.1:8080
--machine-api-bind-addr=127.0.0.1:8090
--siderolink-api-advertised-url=https://api.$OMNI_DOMAIN:443
--k8s-proxy-bind-addr=127.0.0.1:8100
--advertised-kubernetes-proxy-url=https://kube.$OMNI_DOMAIN/
--account-id=$OMNI_UUID
--siderolink-use-grpc-tunnel=true
## Also add the authentication flags according to your setup
Certificates
You can use acme or certbot to generate certificates for your domain. In the following nginx config, the are stored in /var/lib/acme/omni/ and /var/lib/acme/omni_api/ and /var/lib/acme/omni_kube/. Make sure to change the paths to your own or to output the certificates to those paths.
Nginx configuration
Use the following configuration to expose omni with nginx. Make sure to change the domain name ($OMNI_DOMAIN) to your own domain and to update the certificate paths if applicable.
http {
	proxy_redirect          off;
	proxy_connect_timeout   60s;
	proxy_send_timeout      60s;
	proxy_read_timeout      60s;
	proxy_http_version      1.1;
	# $connection_upgrade is used for websocket proxying
	map $http_upgrade $connection_upgrade {
		default upgrade;
		''      close;
	}
    server {
		listen 0.0.0.0:80 ;
		listen [::0]:80 ;
		server_name $OMNI_DOMAIN ;
		location / {
			return 301 https://$host$request_uri;
		}
	}
	server {
		listen 0.0.0.0:443 http2 ssl ;
		listen [::0]:443 http2 ssl ;
		server_name $OMNI_DOMAIN ;
		ssl_certificate /var/lib/acme/omni/fullchain.pem;
		ssl_certificate_key /var/lib/acme/omni/key.pem;
		ssl_trusted_certificate /var/lib/acme/omni/chain.pem;
		location / {
			proxy_pass http://127.0.0.1:8080;
			proxy_http_version 1.1;
			proxy_set_header Upgrade $http_upgrade;
			proxy_set_header Connection $connection_upgrade;
			grpc_pass grpc://127.0.0.1:8080;
		}
	}
	server {
		listen 0.0.0.0:443 http2 ssl ;
		listen [::0]:443 http2 ssl ;
		server_name api.$OMNI_DOMAIN ;
		ssl_certificate /var/lib/acme/omni_api/fullchain.pem;
		ssl_certificate_key /var/lib/acme/omni_api/key.pem;
		ssl_trusted_certificate /var/lib/acme/omni_api/chain.pem;
		location / {
			grpc_pass grpc://127.0.0.1:8090;
		}
	}
	server {
		listen 0.0.0.0:443 http2 ssl ;
		listen [::0]:443 http2 ssl ;
		server_name kube.$OMNI_DOMAIN ;
		ssl_certificate /var/lib/acme/omni_kube/fullchain.pem;
		ssl_certificate_key /var/lib/acme/omni_kube/key.pem;
		ssl_trusted_certificate /var/lib/acme/omni_kube/chain.pem;
		location / {
			proxy_pass http://127.0.0.1:8100;
			proxy_http_version 1.1;
			proxy_set_header Upgrade $http_upgrade;
			proxy_set_header Connection $connection_upgrade;
		}
	}
}
How to use
The omni instance will be available at https://$OMNI_DOMAIN/, the API at https://api.$OMNI_DOMAIN/ and the kubernetes proxy at https://kube.$OMNI_DOMAIN/.
19.5 - Configure Entra ID AD for Omni
In the Azure portal, click “Enterprise Applications”.
Click “New Application” and search for “Entra SAML Toolkit”.
Name this application something more meaningful if desired and click “Create”.
Under the “Manage” section of the application, select “Single sign-on”, then “SAML” as the single sign-on method.
In section 1 of this form, enter identifier, reply, and sign on URLs that match the following and save:
- Identifier (Entity ID):
https://<domain name for omni>/saml/metadata - Reply URL (Assertion Consumer Service URL):
https://<domain name for omni>/saml/acs - Sign on URL:
https://<domain name for omni>/login
From section 3, copy the “App Federation Metadata Url” for later use.
Again, under the “Manage” section of the application, select “Users and groups”.
Add any users or groups you wish to give access to your Omni environment here.
19.6 - Configure Okta for Omni
- Log in to Otka
- Create a new App Integration
- Select “SAML 2.0”
- Give the Application a recognisable name (we suggest simply “Omni”)
- Set the SAML Settings and Attribute Statements as show below:

- Click “Next” and optionally fill out the Feedback, then click “Finish”
Once that is complete, you should now be able to open the “Assignements” tab for the application you just created and manage your users and access as usual.
19.6.1 -
how-to-configure-okta-for-omni
19.7 -
self-hosted
20 - Using SAML with Omni
Omni can integrate with your enterprise SAML provider for authentication and identity management. See also information about how SAML impacts Omni authentication. Please contact support@siderolabs.com or your account manager to enable SAML on the SaaS version of Omni.
20.1 - Auto-assign roles to SAML users
This guide shows you how to configure your Omni instance so that new users logging in with SAML authentication are automatically assigned to a role based on their SAML role attributes.
Create the file assign-operator-to-engineers-label.yaml for the SAMLLabelRule resource, with the following content:
metadata:
  namespace: default
  type: SAMLLabelRules.omni.sidero.dev
  id: assign-operator-to-engineers-label
spec:
  assignroleonregistration: Operator
  matchlabels:
    - saml.omni.sidero.dev/role/engineers
As an admin, create it on your Omni instance using omnictl:
omnictl apply -f assign-operator-to-engineers-label.yaml
This will create a resource that assigns the Operator role to any user that logs in with SAML
and has the SAML attribute Role with the value engineers.
Log in to Omni as a new SAML user with the SAML attribute with name Role and value engineers.
This will cause the user created on the Omni side to be labeled as saml.omni.sidero.dev/role/engineers.
This label will match the SAMLLabelRule resource we created above,
and the user will automatically be assigned the Operator role.
Note
When there are multiple matches from differentSAMLLabelRule resources,
the matched role with the highest access level will be assigned to the user.
Warning
This role assignment will only work for the new users logging in with SAML.
The SAML users who have already logged in to Omni at least once
will not be matched by the SAMLLabelRule resource and their roles will not be updated.
Warning
If the logged in SAML user is the very first user logging in to an Omni instance, it will not be matched by theSAMLLabelRule resource
and always be assigned the Admin role.
20.2 - Add a User to Omni with SAML Enabled
This guide shows you how to create a user in an Omni instance with SAML authentication enabled.
Grant the new user access to Omni in your SAML identity provider. The new user should login to the new user account, in order for Omni to have the account synchronized with the SAML provider.
Log into Omni using another account with Admin permissions.
Find the newly added user in the list of users.
Now, select “Edit User” from the menu under the ellipsis:

Change the role to Reader, Operator or Admin as appropriate:

Next, click “Update User”:

20.3 - Configure Unifi Identity Enterprise for Omni
Unifi Identity Enterprise
This section describes how to use Unifi Identity Enterprise (here forward UIIE) SSO with Omni via SAML
First, login to the UIIE Manager portal and navigate to the SSO Apps section in the left menu.
Next, Add a new app. Choose “Add Custom App”

Next, click Add on the “SAML 2.0” option for Sign-on Method

You’ll now be in the Add SAML 2.0 App screen where we’ll define the app.

| Option | Value | Description |
|---|---|---|
| Name | Omni | A descriptive name for the Web App |
| Icon | <your choice> | Upload an icon of your choosing |
| Single Sign-On URL | https://<fqdn for omni>/saml/acs | The fully-qualified domain name at which your omni instance will reside |
| Audience URI (SP Entity ID) | https://<fqdn for omni>/saml/metadata | The fully-qualified domain name for metadata retrieval |
| Default Relay State | Leave this blank | |
| Name ID Format | Unspecified | Unspecified works, you can probably also choose emailAddress |
| App Username | Works best with emails as usernames however prefixes might work too | |
| SCIM Connection | Off | Not used |
After entering the above values and clicking the “Add” button, you’ll be taken to another screen with some details. We don’t need anything from here, we’ll get info we need later after further configuration, so just click “Done” to proceed.
You’ll now be on the screen to manage the app, here you’ll want to assign users/groups according to who you would like to have the ability to login to Omni. To start with, you probably only want to assign the person who will be the primary admin, as the first user to login will be granted that role in Omni. Therefore, best practice would be to assign your primary admin, have them login to Omni, then come back into the app here and assign any other users who should have access.
Once you’ve assigned the user(s) accordingly, click the “Settings” bubble at the top of the screen as some final configuration is needed here.

Expand the “Sign On” section at the bottom of the settings page via the “Show More” down arrow.

At the bottom of this section, you’ll see an “Attibute Statements” block, here the mappings from UIIE to Omni fields needs to be entered as below. Use the “Add Another” button to create new ones.

| Name | Name Format | Value | Description |
|---|---|---|---|
| Unspecified | The user’s email address | ||
| firstName | Unspecified | First Name | The user’s first name |
| lastName | Unspecified | Last Name | The user’s last name |
Lastly, you’ll need the IDP Metadata file which can be obtained via the View Setup Instructions link or downloaded as an xml file via the Identity Provider metadata link; both of which are slightly further up the page.

A copy of this file needs to be on the host which will run the Omni container as we’ll feed it in to the container at runtime. You can copy paste contents or download/upload the file whichever is easiest. For the remainder of this guide, we’ll assume this file ends up at the following location on your container host: ~/uiieIDPmetadata.xml
This completes the configurations required in UIIE
Omni
To get Omni to use UIIE as a SAML provider, the following flags should be passed to Docker & the Omni container on launch.
| Scope | Flag | Description |
|---|---|---|
| Docker | -v $PWD/uiieIDPmetadata.xml:/uiieIDPmetadata.xml | Make available the IDP metadata file in container |
| Omni | --auth-saml-enabled=true | Enable SAML authentication. |
| Omni | --auth-saml-metadata-/uiieIDPmetadata.xml | The path to the IDP metadata file. |
For example;
docker run \
...
-v $PWD/uiieIDPmetadata.xml:/uiieIDPmetadata.xml
...
ghcr.io/siderolabs/omni:latest \
  --auth-saml-enabled=true
  --auth-saml-metadata-/uiieIDPmetadata.xml
Unfortunately UIIE does not expose group attributes, so you will have to manually assign Omni groups/roles to the users as they are created on first login.
20.4 - Configure Workspace ONE Access for Omni
Workspace ONE Access
This section describes how to create a Web App inside Workspace ONE Acces (WSOA).
First, login to the WSOA user interface and browse to Resources -> Web Apps -> New

Next, enter values for the following options before clicking on Next.
| Option | Value | Description |
|---|---|---|
| Name | Omni | A descriptive name for the Web App |
| Description | Sidero Omni | A description for the Web App |
| Icon | Image | An icon to be displayed on the dashboard |

On the Single Sign-On page, enter the following values:
| Option | Value | Description |
|---|---|---|
| Authentication Type | SAML 2.0 | The Authentication type. Options are SAML or OIDC |
| Configuration | Manual | We will use manual to specify the fields |
| Single Sign-On URL | https://{omni-host}/saml/acs | The SSO URL for Omni |
| Recipient URL | https://{omni-host}/saml/acs | The Recipient URL for Omni |
| Application ID | https://{omni-host}/saml/metadata | The Omni metadata URL |
| Username format | Unspecified | The username format is unspecified |
| Username value | ${user.userName} | The username sent in the SAML assertion |
| Relay State URL | Blank | Leave this empty |

Still on the Single Sign-On page, in the Advanced Properties section, set the following toggle buttons;
| Option | Value | Description |
|---|---|---|
| Sign Response | False | Sign the SAML response. |
| Sign Assertion | True | Sign the SAML assertion. |
| Encrypt Assertion | False | Encrypt the SAML assertion. |
| Include Assertion Signature | False | Include the assertion signature. |
| Device SSO Response | False | Enable Device SSO response. |
| Enable Force Authn Request | False | Enable Force Authn Request. |
| Signature Algorithm | SHA-256 with RSA | The signature algorithm. |
| Digest Algorithm | SHA-256 | The digest algorithm. |
| Assertion Lifetime | 200 | The assertion lifetime. |

At the bottom of the Single Sign-On page, in the Custom Attribute Mapping section, add the following attributes:
| Name | Format | Namespace | Value | Description |
|---|---|---|---|---|
| Unspecified | ${user.email} | The user’s email address | ||
| firstName | Unspecified | ${user.firstName} | The user’s first name | |
| lastName | Unspecified | ${user.lastName} | The user’s last name | |
| groups | Unspecified | ${groupNames} | The user’s groups |

Click Next to continue and select the access policy as required by your organization.

Now it’s time to click the Save & Assign button and permit the Users and Groups allowed to login to Omni.

On the Assign screen, enter the following:
- Select the permitted group from your backing Active Directory or LDAP server.
- Set the Deployment Type to Automatic.

Finally, obtain the IdP Metadata URL by clicking on Settings and then the Copy URL link.

Note
This is the URL that will be used by Omni in the command line arguments in the next section.
Omni
Provide the following flags to the Omni container on launch.
| Flag | Description |
|---|---|
--auth-saml-enabled | Enable SAML authentication. |
--auth-saml-url | The URL to the IdP metadata file. |
--auth-saml-label-rules='{"groups": "groups"}' | This extracts the groups attribute from the SAML assertion into the label saml.omni.sidero.dev/groups/<value> |
For example;
--auth-saml-enabled=true
--auth-saml-url=https://{workspace-one-host}/SAAS/API/1.0/GET/metadata/idp.xml
--auth-saml-label-rules='{"groups": "groups"}'
Now that you have started Omni with the correct flags, refer to the Auto-assign roles to SAML users guide for information on how to automatically assign roles to users based on their SAML attributes.
Note that when using groups, the group name is prefixed with saml.omni.sidero.dev/groups/ instead of role. For example;
metadata:
  namespace: default
  type: SAMLLabelRules.omni.sidero.dev
  id: assign-admin-to-platform-admins-label
spec:
  assignroleonregistration: Operator
  matchlabels:
    - saml.omni.sidero.dev/groups/omni-platform-administrators